
Updated on: June 2, 2026
Macs have built-in security settings, but they’re often not used effectively — leaving your data and privacy vulnerable to attacks. However, even if you turn on all of Apple’s security features, it’s still not enough to keep your Mac 100% secure against the latest malware or other cybersecurity threats.
I recommend following my tips below and installing a reliable macOS antivirus suite, like Intego ONE, which will not only protect your device from all threats but also make sure it’s optimized for peak performance.
Here are the top 20 things you should be doing to secure your Mac and personal information from the most advanced cybersecurity threats in 2026.
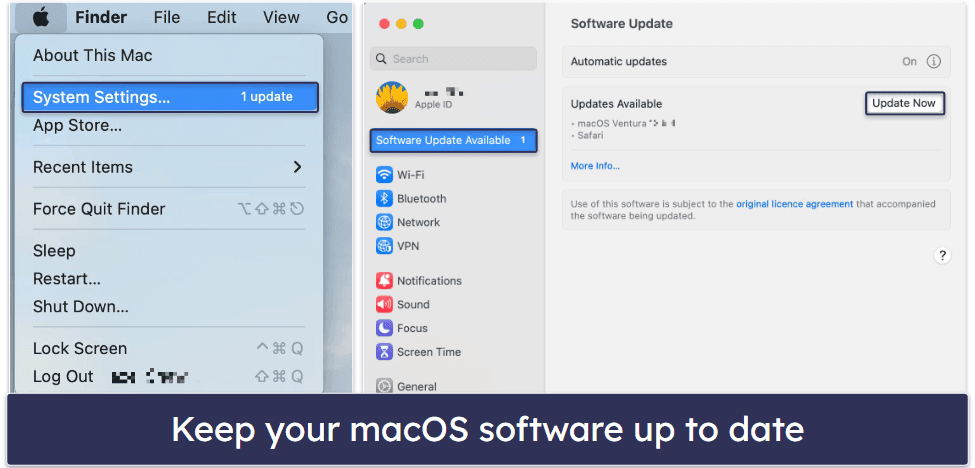
1. Keep Your Mac’s OS & Software Updated
The best way of keeping your Mac safe is to keep your Mac software and programs updated. Cybercriminals target outdated software because they know where to find security vulnerabilities that developers only patch in updated versions.
The easiest way to keep your macOS software up to date is by enabling automatic updates. Simply click on the Apple icon on the top left of your screen, select System Settings, and then click Software Update. If there is a new macOS version available that you’ve not yet installed, this will be shown here. Click Update Now to install the update straight away.
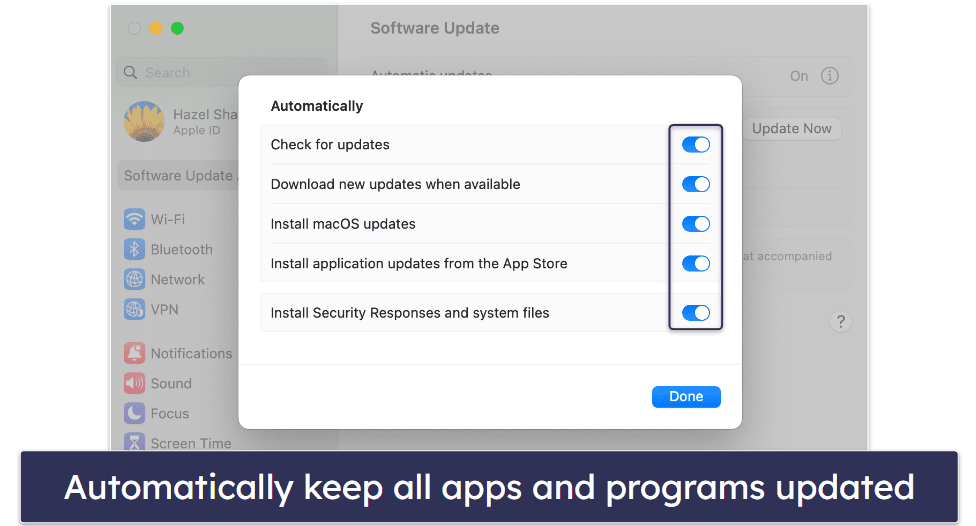
To enable automatic updates, all you have to do is switch on Automatic updates at the top of the Software Update window. Click on the information icon and double-check that all options are switched on — this will ensure you get all essential security fixes for macOS and your downloaded App Store apps and programs as soon as they’re released.
2. Secure Your Login Details & Settings
You should always use a login password. If you’re the only person that tends to use your Mac, it might be tempting to not use a login password, but this is a big mistake. If someone were to gain access to your Mac, not only can they access all of your files and data, but if your main account also has admin rights, they can cause even more damage.
There are a few simple steps to greatly improve your login security:
- Use a secure password.
- Disable auto-login.
- Disable password hints.
- Automatically lock your Mac as soon as it’s inactive.
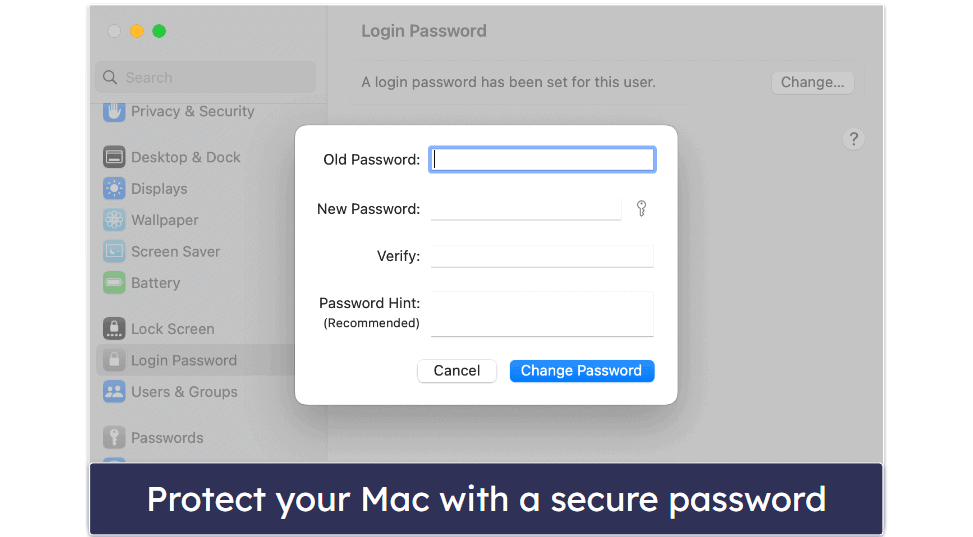
To set up a secure password, open System Settings and then Login Password. Click on your user account, then click the Change… button. You’ll need to choose a password that you can easily remember, but make sure it will also be hard to guess or crack.
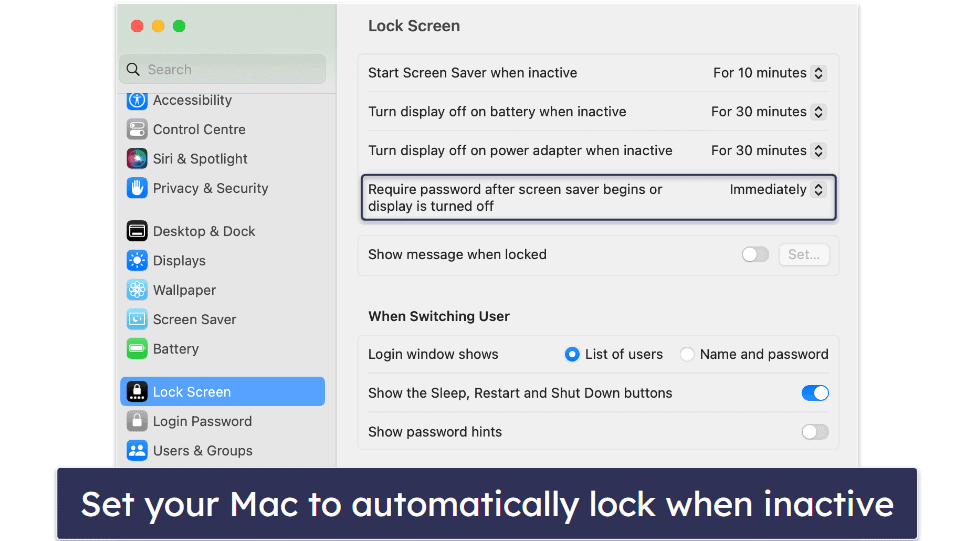
Apple suggests adding a password hint, but this may allow others to guess your password, so I’d only use this if you really think you’ll need it. You can either leave the password hint field blank or disable it entirely by navigating to your Lock Screen settings and unchecking the “Show password hints” box.
It’s also important to ensure that automatic login is disabled. This stops anyone that gains access to your device (i.e. if it’s stolen) from being able to log straight in.

From Users & Groups, make sure the Automatically log in as option says “Off”. If you have FileVault enabled (see below), or use your iCloud password to log into your account, you’ll find that auto-login is automatically disabled.
Finally, make sure your Mac automatically locks as soon as it is inactive. This prevents anyone being able to access it if you leave it unattended. Navigate to System Settings > Lock Screen, then go to “Require password […] after sleep or screen saver begins” and choose “Immediately” from the dropdown list.
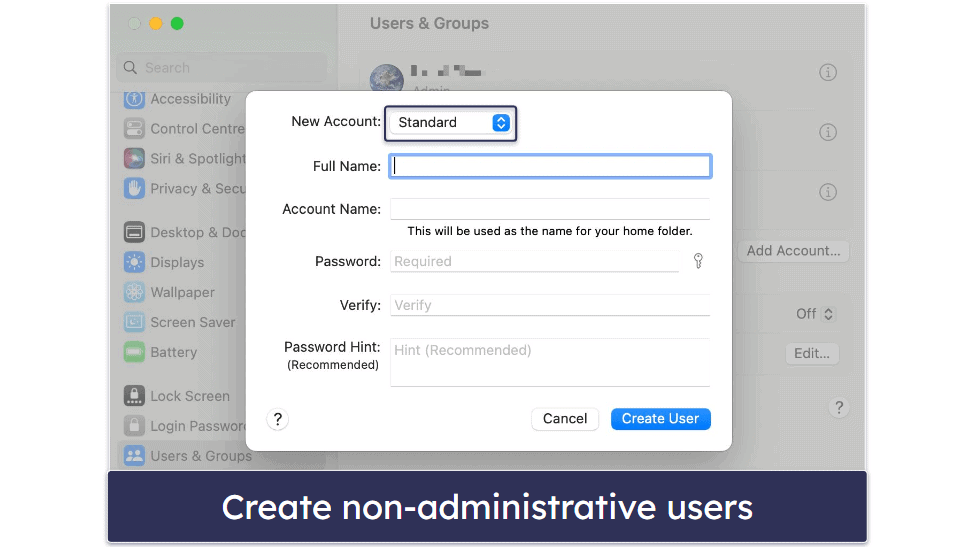
3. Create a Non-Admin Account
If you’re not the only person that uses your Mac, create additional user accounts — without administrative privileges — to protect your personal data and your Mac’s overall security settings.
This means other users will have to log into their accounts with their own password and will only be able to access their own files and make changes to their own settings. More advanced settings that affect the security of your entire Mac are limited to the administrator only.
For the most protection, you can create a “Sharing Only” account, in which the user can only access files you’ve chosen to share but can’t access any other files or locations or change any settings on the computer.
To create new users, go to System Settings > Users & Groups. Click on the Add Account button to add a new user, choose the type of user or group, and fill out the required information.
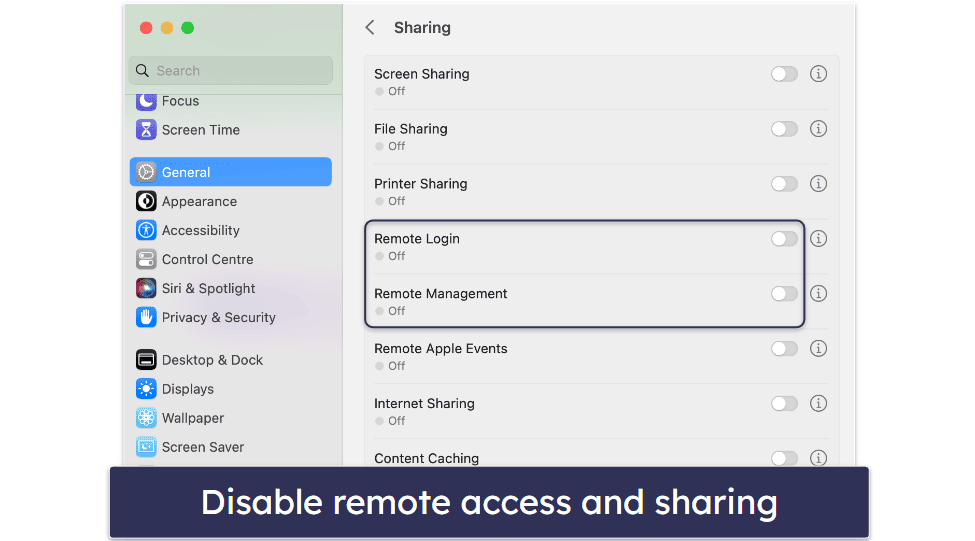
4. Disable Remote Access & Sharing
Remote access can be useful if you need to access the files on your Mac from anywhere. However, if your login details were to be compromised, this would mean others would also easily be able to remotely access all your files and data. So it’s well worth disabling this feature when you don’t need to use it.
Go to System Settings > Sharing and untick the boxes next to “Remote Login”, “Remote Management”, and all the other sharing services you don’t need. My recommendation is to disable all sharing options until and unless you need them.
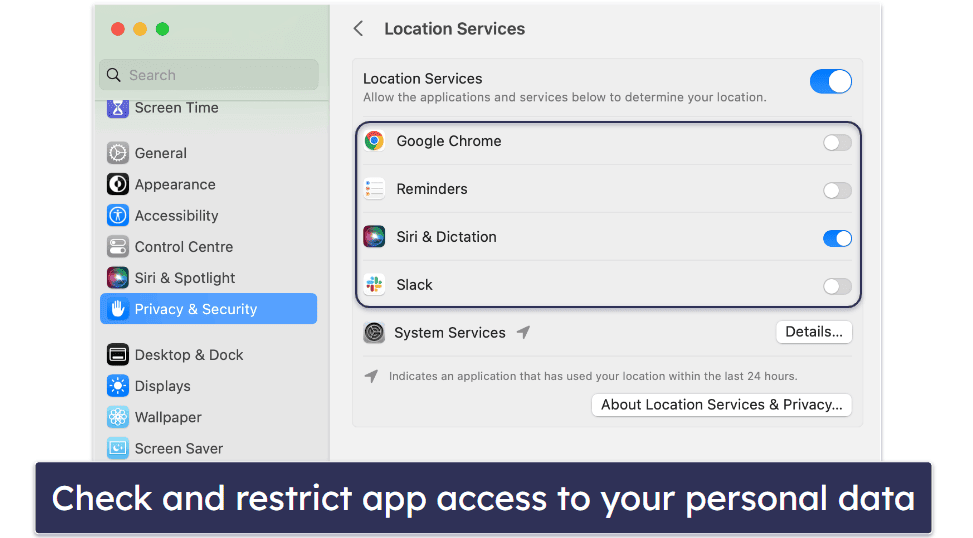
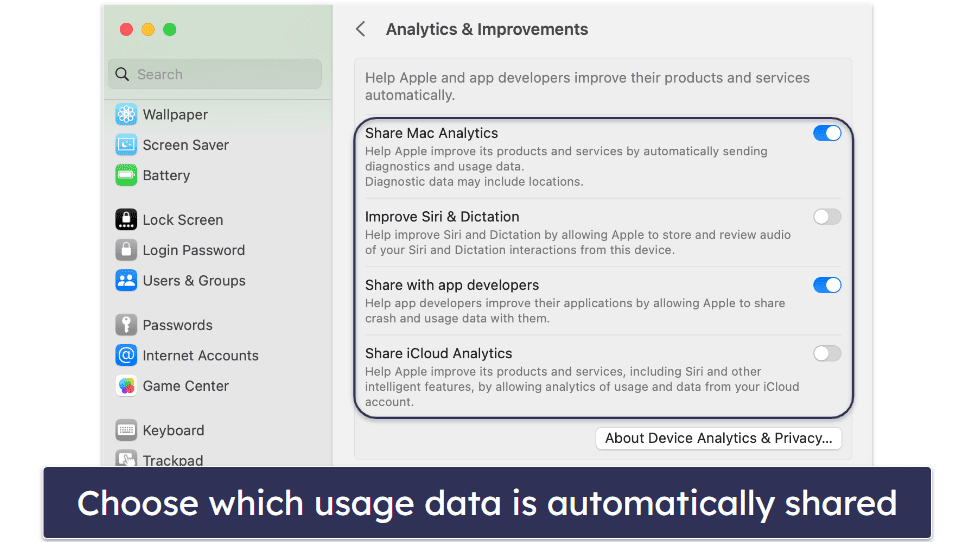
5. Change the Default Privacy Settings
Your Mac has default settings that allow Apple and other apps to share and view your data, including usage data and location.
This information includes:
- App access to your contacts, calendars, and other personal data.
- Location services.
- Diagnostic and usage data sharing.
To review and amend these settings, navigate to System Settings > Privacy & Security. Under the Privacy tab, you’ll see all of the apps that have access to your data, including your location, contacts, calendars, and more. Check through all these settings and make sure you’re happy with what each app has access to. And if in doubt — restrict the access.
You can also see if you’re unknowingly sending usage data to Apple and other app developers by clicking Analytics & Improvements at the bottom of the menu. Then simply uncheck the options for data you don’t want to be automatically sent to Apple or other app developers.
6. Enable iCloud Two-Factor Authentication
Two-factor authentication (2FA) provides an extra layer of security. It’s where you’re required to input a randomly generated one-time code along with your account password when logging into your accounts. This way, hackers won’t be able to guess the randomly generated one-time password.
To set up 2FA on your iCloud account, click System Settings > Apple ID > Password & Security. Then click Turn On next to “Two-Factor Authentication”. You’ll be asked to input your phone number to receive the two-factor authentication codes.
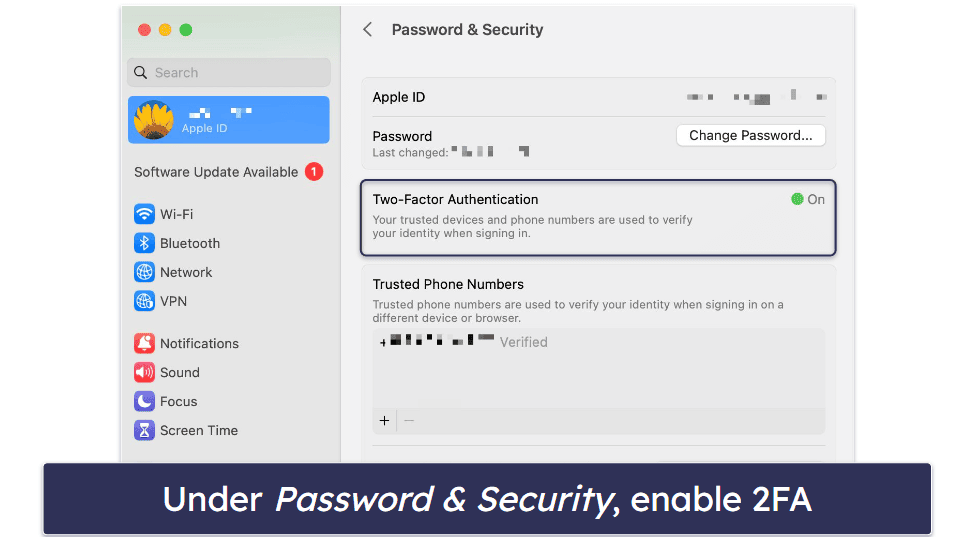
Once set up, you’ll now receive a one-time password every time you log into your iCloud account on a new device or when logging in online.
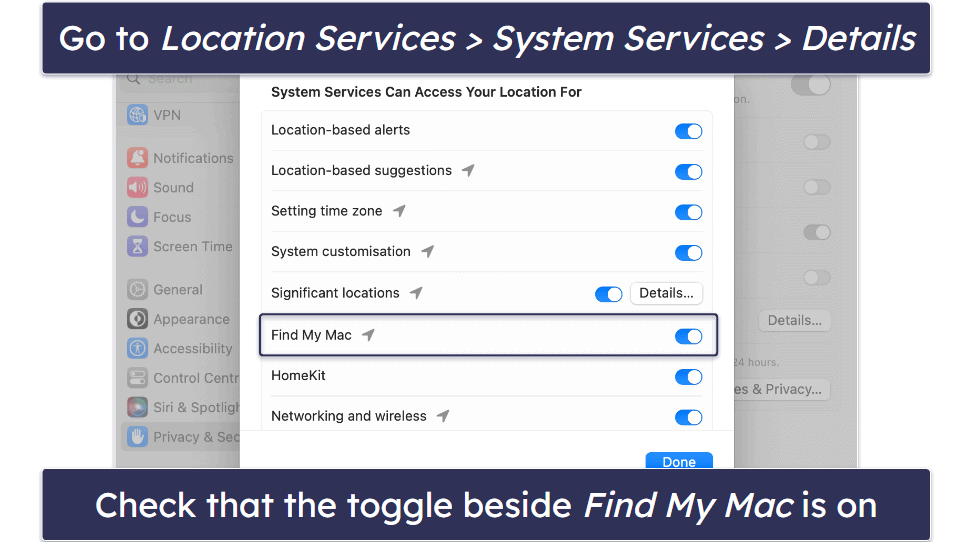
7. Turn on “Find My Mac”
Apple’s Find My Mac feature allows you to locate your Mac if it gets lost or stolen — as long as you’ve activated it in advance. But not only that, you can also remotely lock it and/or wipe your drive completely.
To set up Find My, you first need to enable it in location services. Go to System Settings > Privacy & Security. Then under Privacy, click on Location Services and find System Services in the list of apps. If you click the Details… button, you’ll see a list of built-in apps that can access your location. Make sure the toggle next to Find My Mac is on to enable the feature.
Then go to System Settings > Apple ID and click on iCloud. Scroll through the list of apps until you find Find My Mac and click on the arrow beside it. Then make sure both Find My Mac and Find My network are turned to “on”.
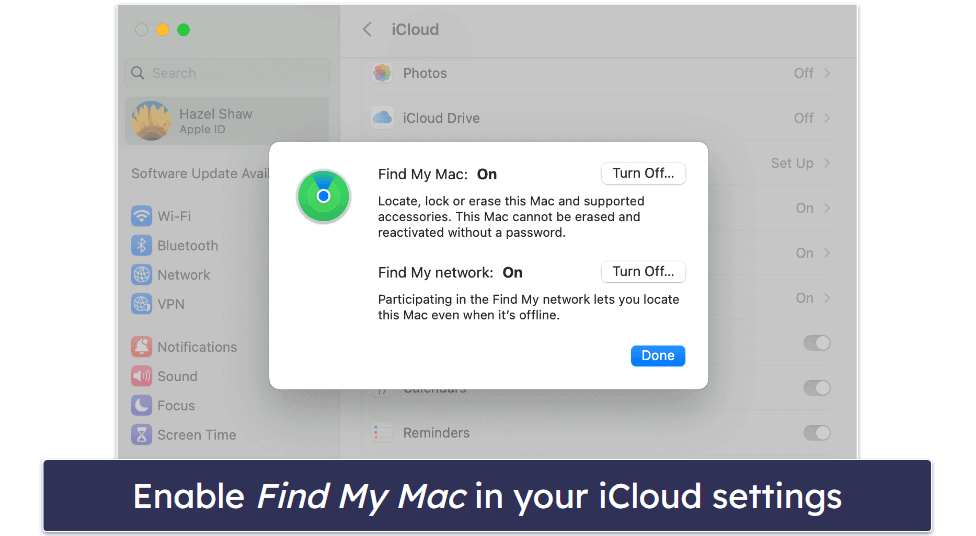
If you ever lose your Mac, you then need to access Find My Mac via another Apple device or by signing into iCloud.com/find, and you can locate your device and either lock it remotely or erase its contents.
8. Turn On Your Mac’s In-Built Firewall
Apple has a built-in firewall that helps block unwanted inbound network connections and keep malware out of your network and device. This is a useful layer of protection that I’d always recommend using — however, it’s turned off by default so you’ll need to manually turn it on to benefit from this protection.
Open Network from System Settings, click on the Firewall tab, and switch it on. If you’re a more advanced user, you can click the Options… button to choose more detailed settings. Otherwise, just let the default settings apply.
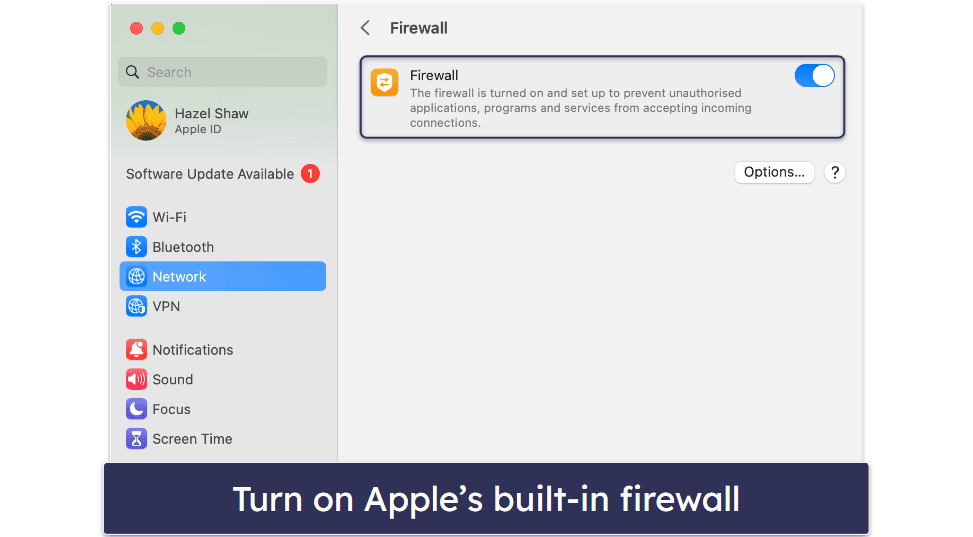
Apple’s firewall protects against incoming traffic only, so if any malware were to find its way onto your Mac, this firewall wouldn’t be able to prevent it from sending your data out. If you want that additional peace of mind, you can install third-party software like Intego ONE, which includes an advanced two-way firewall.
9. Use a Mac Antivirus (That Actually Works)
Hackers are targeting Macs more and more, even though Windows devices have traditionally been the main target of malware. So, it’s increasingly important to keep your Mac protected from new and emerging Mac-based malware threats.
Unfortunately, Apple’s built-in security features aren’t enough to keep your Mac 100% protected against threats like ransomware, spyware, keyloggers, phishing attacks, and data breaches, so you need an antivirus program to keep you fully protected.
Most antivirus programs are built for Windows first and their Mac programs are an afterthought. Antiviruses like Intego ONE, on the other hand, are Mac-first — and are purposely designed to protect Macs from a huge range of threats, including ransomware and online attacks. When choosing a Mac antivirus (that actually works), you need to look for certain features that will help keep your computer safe:
- Real-time malware protection.
- Advanced ransomware detection and removal.
- Internet security tools.
- Phishing protection.
- Spyware protection.
Intego ONE is my top choice for a Mac antivirus — it has a 100% malware detection rate as well as a whole heap of other useful features to keep your Mac both safe and running well. But if you want to shop around, check out our list of the best Mac antiviruses on the market.
10. Use a Privacy-Focused Browser
Staying safe and securing your privacy while browsing online can be difficult. Apple’s built-in internet browser, Safari, isn’t bad — especially as it includes an anti-tracking feature (see below). But it isn’t open-source, so it’s impossible to scrutinize its code, and Safari also offers far fewer and more irregular updates, which means users could be more exposed to potential vulnerabilities for longer.
Google Chrome, undisputedly the most popular browser, is known to track a lot of user data — after all, Google’s whole business model is based on knowing everything about its customers.
Using an alternative browser that specializes in security is a great way to stay safe online. Some of the best secure browsers are:
- Brave.
- Mozilla Firefox.
- Tor.
These browsers ensure websites aren’t tracking your browsing activity or your IP address (i.e. trying to find your physical location), and they’re all open source. Brave’s browser also blocks malicious scripts that are hidden in scam websites that can hack your device without you knowing.
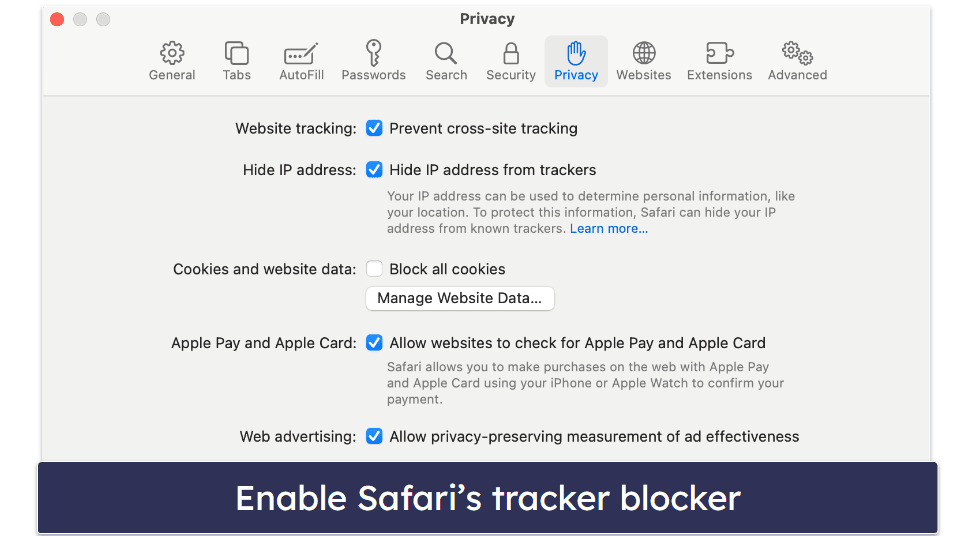
11. Use Safari’s Tracking Link Blocker (or Other Browser Extensions)
The browsers I previously mentioned are the best for security and privacy, but you might just want to stick with your usual browser.
Safari has an excellent anti-tracker blocker, which you should enable if you use this browser. With the Safari browser open, simply go to Preferences, then Privacy, and make sure the “Website tracking” and “Hide IP address” boxes are ticked. If you click on Manage Website Data under the “Cookies” box, you can also see which websites are storing your data and choose to block them. From Preferences, you can also choose Privacy Report to see how many trackers Safari has blocked.
There are also browser extensions for popular browsers that are good at protecting you online. These extensions block ads and stop websites from tracking your browsing activity across the internet. They also work to protect you from phishing websites — sites designed by hackers to imitate popular websites, encouraging you to input your login details so they can steal your accounts and personal information.
Many antivirus brands include easy-to-install ad blockers and tracking link browser extensions in their packages, such as Avira’s Safe Shopping or Norton’s Safe Web.
12. Install a VPN (Virtual Private Network)
VPNs disguise your original IP address and replace it with an IP address in a different location. This means that hackers and websites cannot trace your connection and find your exact location, making you completely anonymous online. VPNs also encrypt your browsing data, so even if hackers could spy on you, they wouldn’t be able to see what you’re doing. VPNs are used for a lot of different reasons — but their main purpose is to give you complete privacy when you’re online.
Depending on your VPN needs and requirements, there are a lot of great options. You can either get a quality standalone VPN for your Mac, such as ExpressVPN, or go for one of the antivirus providers, like Norton 360 and TotalAV, which also include high-quality VPNs in their Mac antivirus packages — which make them a great value option if you’re looking for other forms of protection for your Mac, too.
13. Use a Password Manager
As mentioned previously, using a secure password to lock your Mac is essential. But it’s equally important to protect all your other accounts with secure passwords too, such as your social media profiles and online banking.
Using unique, complex passwords for all of your accounts is vital in this day and age. But with the hundreds of online accounts we now need for our day-to-day activities, remembering hundreds of unique passwords, not to mention truly secure ones, is — frankly — impossible. This is why it’s so tempting to use the same password for everything, but if you do this and your password is hacked, your entire online identity is compromised! A password manager is therefore the only real option.
There are many reasons to use a password manager, including:
- Instantly creating new, unique, complex passwords.
- Securely saving all your passwords in one place, and accessing them from any device.
- Saving time when logging in to websites and apps.
- Storing payment card information for online shopping.
Apple offers its own password manager — iCloud Keychain. It works by saving and securely storing your account login credentials, passwords, and payment card information. All information is encrypted with AES 256-bit encryption, also known as “military-grade encryption”.
While iCloud Keychain can be useful, it is limited — it can only be used for Apple products, so if you also have an Android phone and a Windows PC, you won’t be able to sync your passwords between devices.
There are many great alternative password managers for Mac, but 1Password and Dashlane are my top recommendations. They work with all operating systems, so you can seamlessly sync between all your devices, and they come with a huge range of features that make managing your passwords super easy — such as secure password sharing, data breach monitoring, and lots more.
14. Encrypt Your Hard Drive
Encrypting your hard drive basically means securing your data behind a password. For example, a thief or hacker wouldn’t be able to access personal information and sensitive documents on your device if they’re encrypted and require a password to unlock them. Apple has a built-in encryption tool, named FileVault, which makes securing your most sensitive personal information very easy.
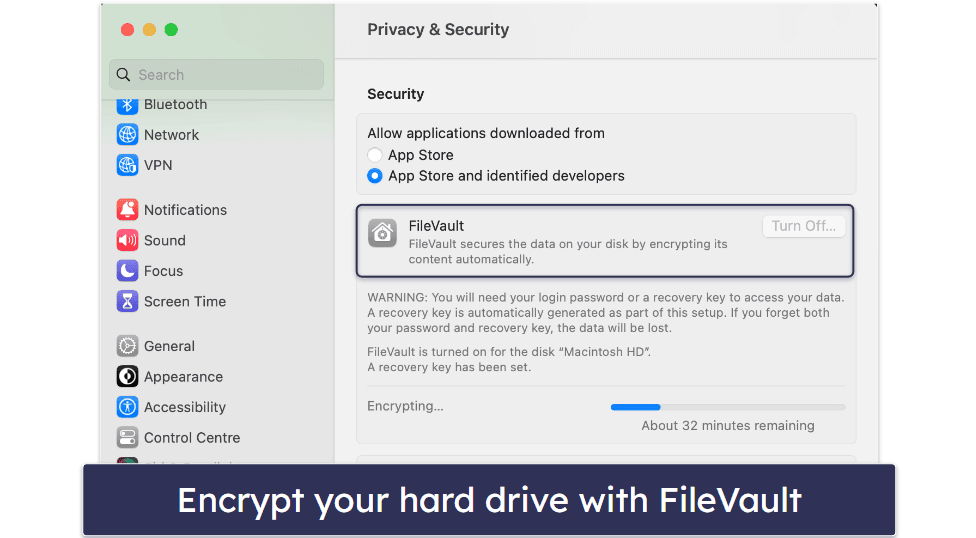
Simply go to System Settings > Privacy & Security and scroll down until you find FileVault. Click the “Turn On” button to switch it on. To avoid forgetting the encryption password and losing access to your files, you’ll be given the option to use your iCloud account to decrypt your files and reset your encryption password if you forget it. Alternatively, you can create a recovery key. But you must keep a record of the recovery key somewhere safe, not on your device.
15. Back Up Your Files
Regularly backing up your files ensures that you’ll always have a copy of your files if something happens to your Mac, including if it gets lost, stolen, or needs repairs.
Apple makes backups easy with its Time Machine feature. Time Machine is used to regularly back up your files on a separate, external hard drive so that you can restore your Mac and data from a specific recent time.
To set it up, connect an external hard drive that’s the same size (or bigger) as your Mac’s drive and has no other files stored on it. Open the Time Machine app from System Settings > General, click the “+” icon to add a disk then click the Set Up Disk. And that’s it. I’d suggest clicking Options and enabling automatic backups, so you don’t have to worry about remembering to backup manually.
Once you’ve set it up, Time Machine works automatically so long as your external drive is connected to your Mac (and it will send you reminder notifications if you don’t connect your external drive for a while). If your external disk runs out of space, Time Machine automatically erases the oldest version of the files to make room for the new one, so it’s a pretty failsafe option for ensuring you’ll never lose all your files.

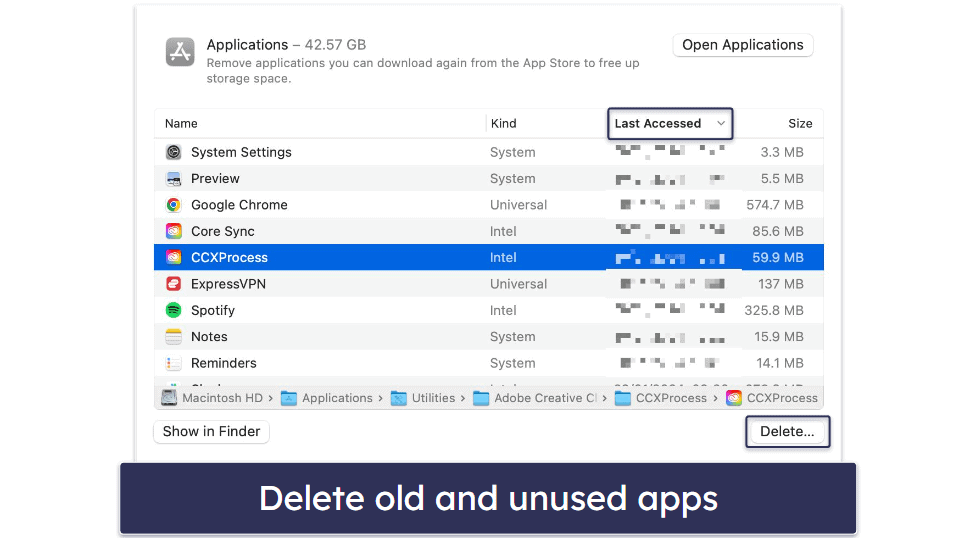
16. Delete Software You Don’t Need
Outdated software can sometimes be a security risk, as it may have known vulnerabilities that remain exposed. To check for old or unused apps on your Mac, go to System Settings > General > Storage then click on the information icon next to Applications.
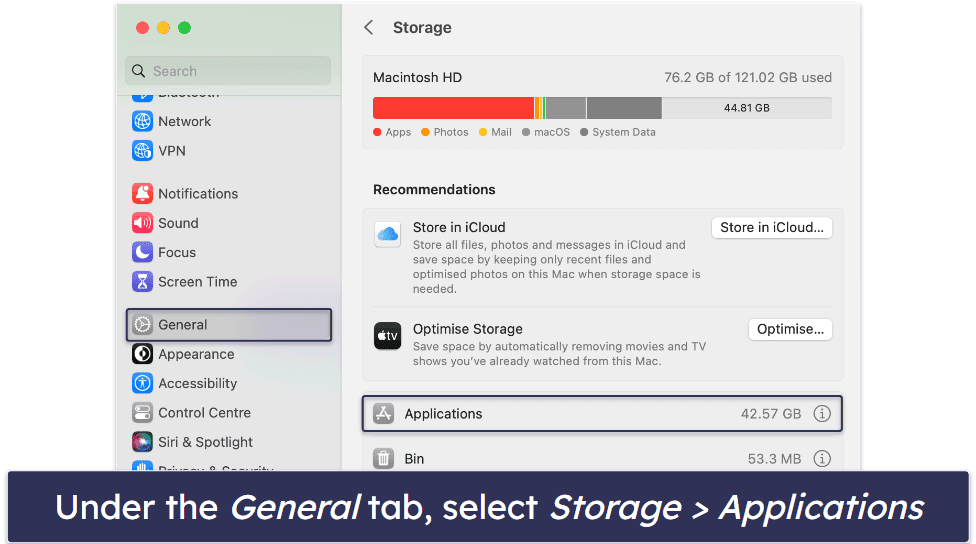
In the pop-up window, sort by “Last Accessed” to see apps you’ve not used in a long time, which you may want to delete.
17. Be Wary of the Software You Install
Cybercriminals often try to trick users into downloading fake or malicious software, so always be wary of any new software you install.
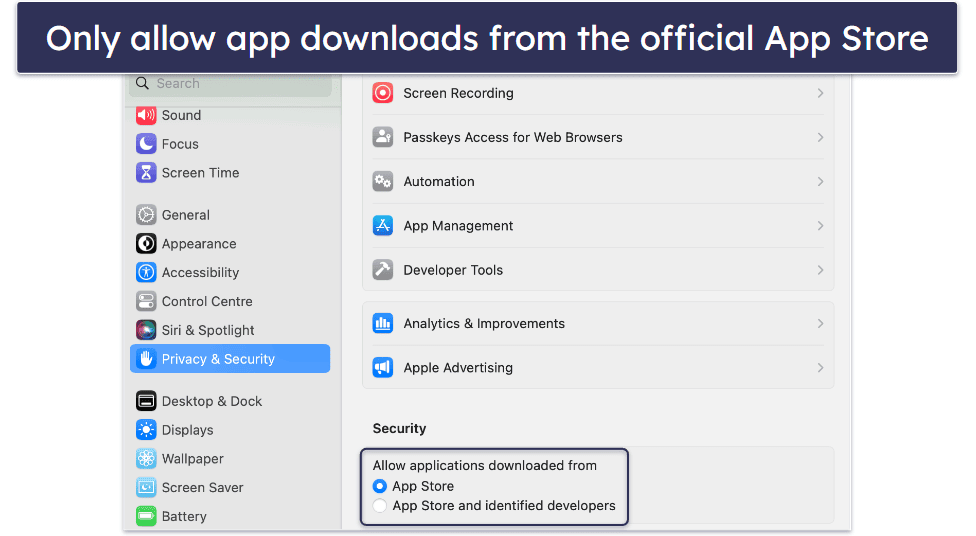
The safest bet is to only download apps from the Apple App Store, as these have all been checked and approved by Apple. Apple also has an “Identified Developers” list, which theoretically should mean it’s safe and reputable software, but there’s still a risk malware could sneak its way into these apps. So for extra security, you can change your settings to only allow App Store software to be downloaded. From System Settings, click Privacy & Security and scroll until you find the “Allow applications downloaded from” option, and change it to App Store.
Also be wary of any permissions that apps are asking for — such as needing access to your camera, microphone, or contacts — and only grant it if there is a good reason. And be very wary of any apps asking you to reduce your security settings in order to install.
However, I recommend using a quality antivirus software like Norton or Intego ONE — it’s the best and safest way to ensure you don’t accidentally download malicious software. So long as you have their real-time protection enabled, the antivirus scanner will check all software before you start downloading it, and it will block anything malicious.
18. Disable Spotlight Suggestions
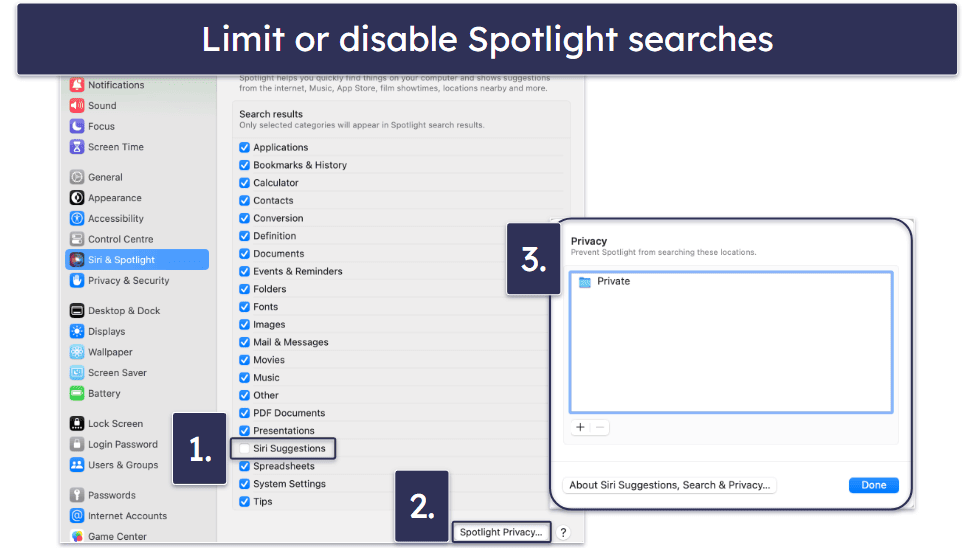
Apple’s “Spotlight” feature is a useful way of searching your Mac for apps and files, and by default, Spotlight also includes internet searches in order to offer you “Siri Suggestions”. However, data from all these searches can be shared with Apple. None of the data is associated with you, but there’s still a degree of privacy you’re potentially losing — particularly from the internet searches.
To increase your privacy, you can limit where Spotlight is able to search. Go to System Settings > Siri & Spotlight, and under Search Results, uncheck “Siri Suggestions” to eliminate the internet searches. You can also uncheck any other category you don’t want Spotlight to search (and subsequently log the data for).
You can also prevent Spotlight from searching specific folders and locations on your hard drive by clicking the Spotlight Privacy… button and adding or dragging the relevant folder into the Privacy tab.
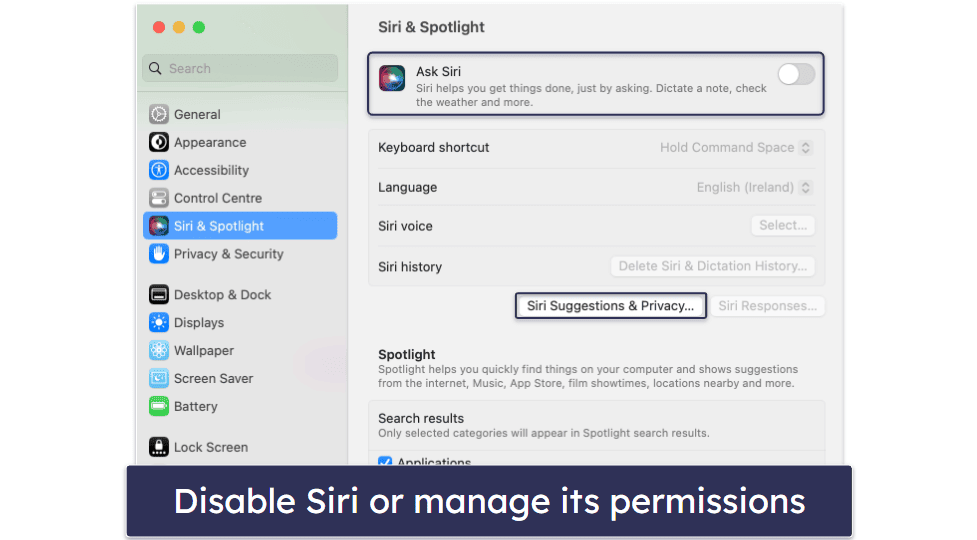
19. Disable Siri
Like Spotlight, Siri has access to all of your personal data, which is shared with Apple. To prevent anything from being shared, simply disable Siri: Go to System Settings > Siri & Spotlight and uncheck the box next to “Ask Siri”. Alternatively, you can choose exactly what data and apps you’re happy for Siri to have access to and share data on by clicking on the Siri Suggestions & Privacy button in the bottom right corner and reviewing the fields for each app listed.
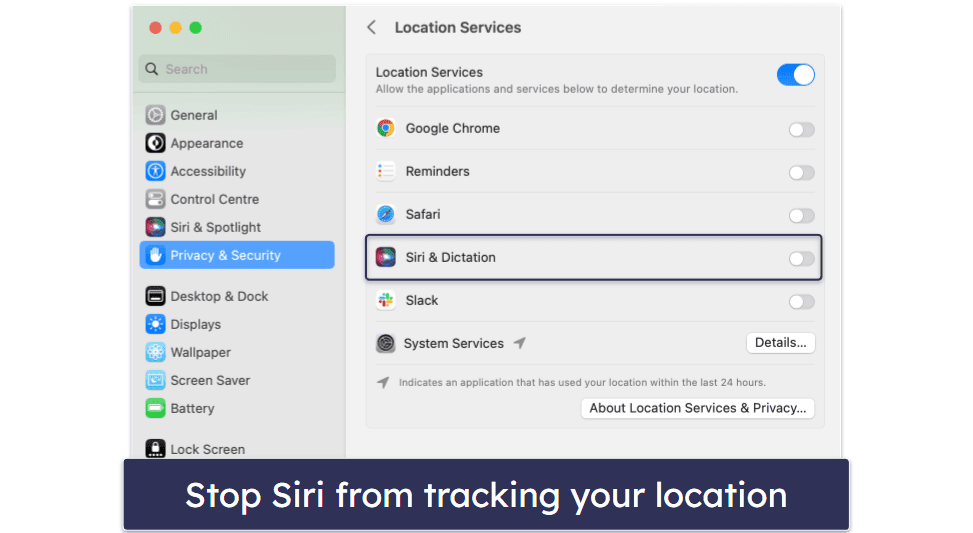
Siri also uses your location to make suggestions, unless you disable this. To do so, go to System Settings > Privacy & Security, choose Location Services and uncheck Siri & Dictation.
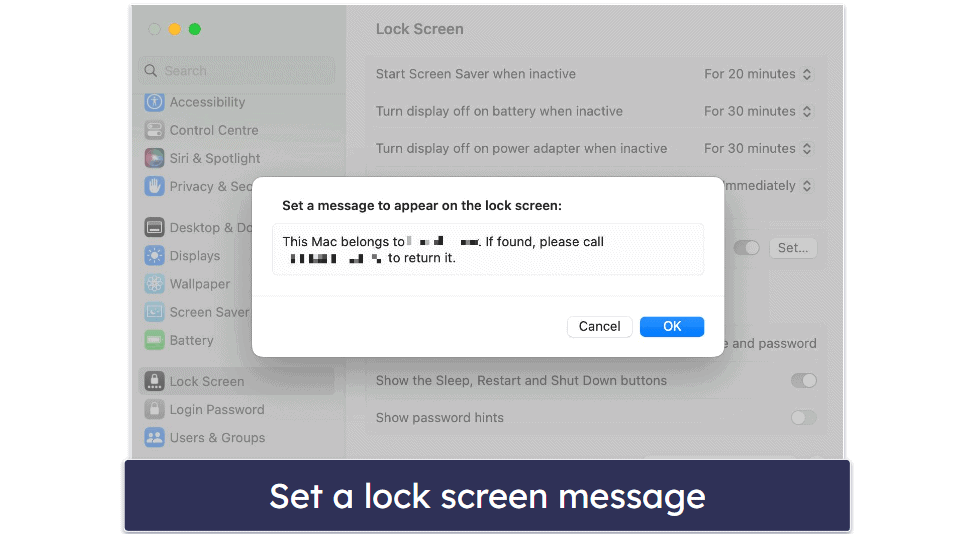
20. Set a Lock Screen Message
A lock screen message with your name and phone number might assist in retrieving your lost or stolen Mac if a reliable person finds it. However, bear in mind that this doesn’t improve your Mac’s security.
To set this up, go to System Settings > Lock Screen. Switch on the toggle next to Show message when locked, then click on the Set… button. Enter the message you wish to display and hit OK. Your message will then be displayed at the bottom of your lock screen, visible to anyone who turns on your Mac.
Editor's Note: Intego ONE and this site are in the same ownership group.
Securing Your Data is More Important Now Than Ever
Cybercriminals increasingly target Mac users, which is why I recommend taking some steps to protect your Mac from potential attacks. By following the advice in this guide, you’ll siginificantly improve your Mac’s security and protect your data from cyber threats.
The most important way to secure your Mac is to install a Mac antivirus on it. For more information, see our list of the 10 best antiviruses for Macs in 2026.
Frequently Asked Questions
How long do macOS software updates take?
The time it takes for your macOS software to install depends on the speed of your device. Updates can sometimes take a few hours for the installation to fully complete. For newer Macs, an update can take around 30 minutes to complete. Before you update your Mac, it’s essential that you back up your data in case the installation fails.
What is the best antivirus for my Mac?
The top pick for Mac antivirus in 2026 is Intego ONE. Exclusively crafted for Macs, Intego ONE consistently safeguards against Mac-oriented malware and viruses. When opting for a Mac antivirus, it’s crucial that it defends you against:
- Ransomware.
- Spyware.
- Keyloggers.
- Online attacks.
- And more…
Macs do have security features built-in to the macOS software. However, these security tools aren’t enough to fully protect you from hackers and malware. So choosing an effective Mac antivirus is necessary.
Before choosing a Mac antivirus, check out the best Mac antivirus programs available, as they all come with a different range of features that may make one a better choice for you.
How does a VPN protect Macs?
A VPN reroutes your Mac’s internet connection through a secure and private server — instead of the server provided by your internet service provider (ISP) who can track your online activity.
VPNs have multiple uses, including:
- Blocking your ISP from tracking your browsing data.
- Stopping hackers from targeting your device when you’re using public Wi-Fi.
- Changing your IP address to make it look like you’re in a different country.
You must choose a VPN service provider that guarantees 100% privacy. Some VPNs (like almost all free VPNs) don’t have a “no-logs” policy, meaning they keep details of all your online activity while connected to their servers, which could then be shared with third-parties. Some also fail to fully protect your IP address, meaning websites can still track your true location.
VPNs can be installed as standalone apps, but many of the best antiviruses now include secure, no-log VPNs with their software.
Can Apple track how I use my Mac?
Yes, unless you change your Mac’s default privacy settings. Apple wants to track your Mac usage to help with their product development, so your Mac computer comes with this option already enabled. Apple can also do other things like tracking your location and iCloud usage. You need to change your privacy settings so Apple no longer has this access.
Editor's Note: Intego ONE and this site are in the same ownership group.


