
Published on: April 6, 2021 Updated 7 times since publishing
Slower PC performance over time is completely normal, especially after years of constant use. It can be caused by a lot of things, from a too-full disk drive to a complete hardware failure.
Usually, you can restore your machine to its optimal performance with simple fixes that most non-technical users can do at home. And some antivirus suites — like TotalAV — come with excellent device optimization tools that make it even easier to keep your PC running at top performance.
Here are 20 simple solutions for speeding up and cleaning a computer. These fixes will help you significantly speed up your device, extend your PC’s lifespan, and save you time and money.
Why Do Computers Slow Down Over Time?
Computer slowdown can be caused by many different factors, including:
- Old and outdated hardware.
- Software issues.
- Viruses or system malware.
After years of constant use, computer components can wear down,
resulting in slower performance. This is totally normal, though it can be a bit annoying. While you may be tempted to upgrade to a new device, there are a few things you can do to help speed up old systems.
Software is another common culprit behind slow-running computers. The more software you install, the more files you’re storing and running on your device. And the more processors your machine has to run, the harder it has to work — which can cause it to slow down. Some software may be unnecessarily slowing your system by running in the background and therefore slowly draining your processing power and battery life.
Computer slowdowns can also be a result of viruses and malware such as ransomware, spyware, and keyloggers, which can get onto computers pretty easily if you don’t have proper internet security protections in place — and they’ll almost always affect your system’s performance. It’s not always obvious if your device has a malware infection, which is why having a reliable antivirus installed (such as TotalAV or Norton 360 — my favorite in 2026) is so important.
So let’s go through 20 quick and easy ways to speed up and clean your computer.
1. Restart Your Computer
Restarting your computer is probably the easiest fix for almost any PC problem, including general system slowdowns. When you restart your computer, you stop all running software, tasks, processes, and open pieces of data that are draining your computer’s processing power.
When you boot back up, your computer will have a lot more free memory to operate, which is why it will likely perform a lot faster. Because restarting your machine is almost effortless (and pretty quick), you should always use this method first before trying anything else.
2. Stop Heavy-Duty Tasks & Programs
You can manually close the apps and programs you’re not using, or you can open the Windows Task Manager — which shows you what programs and background processes are using most of your RAM, CPU, and memory — and close those that are using the most energy.
To do this, open up Task Manager (right-click the Windows Start icon in the lower-left corner of your screen, and select “Task Manager”). Under the “Processes” tab, you’ll see all the processes and programs that are running and the disk space and energy they are using, so you can identify those you want to stop. Then simply click on a program or process and click “End Task” at the bottom right-hand corner of the window. You can also do this by right-clicking on the program you wish to close and clicking “End Task”.
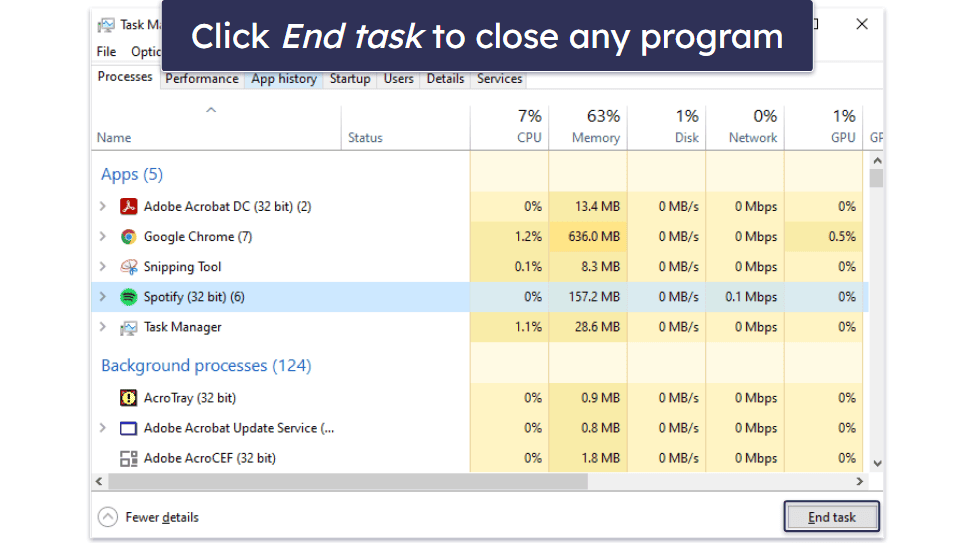
Doing this will drastically reduce the drain on your CPU and likely speed up computer performance, and it will also extend your computer battery’s lifespan (if you have a laptop).
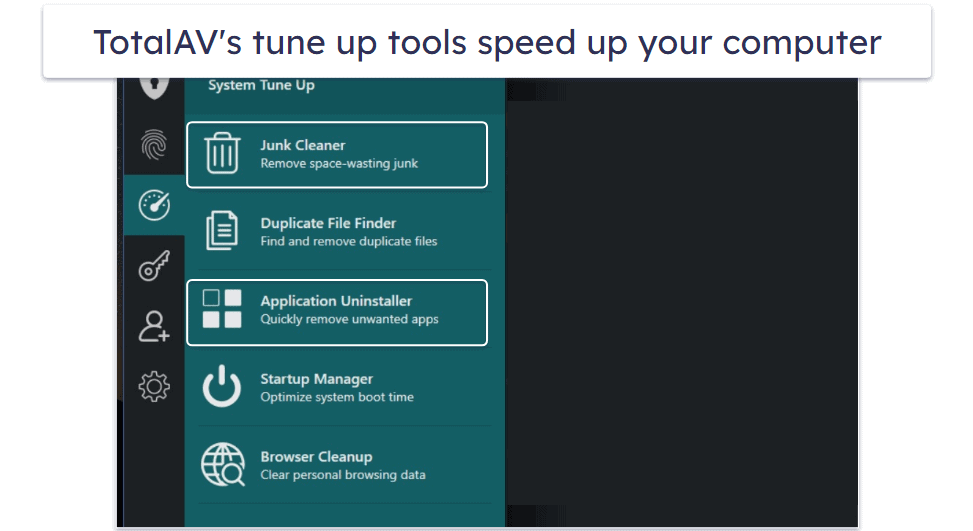
3. Download a Device Optimization Program
Device optimization programs make cleaning and speeding up your PC extremely easy. For example, TotalAV’s System Tune Up feature manages your device’s memory usage by identifying apps that consume too much of your device’s memory and resources and giving you a list of suggested apps to close.
Most top antivirus brands offering system optimization features are subscription-based. Fortunately, they are all pretty affordable. And antiviruses like TotalAV offer a 30-day money-back guarantee, which means you can optimize and clean up your PC and get a full refund if you don’t want to keep the program — making this fix totally free.
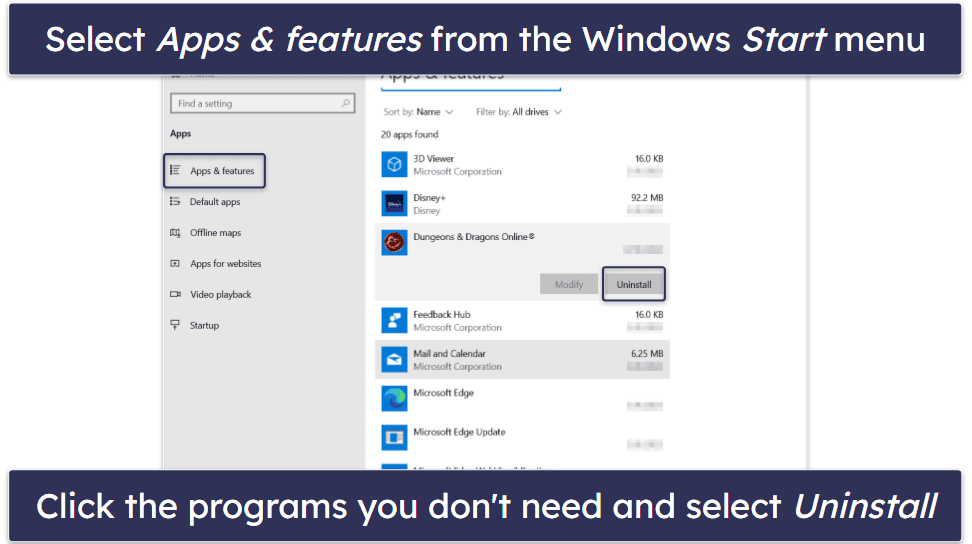
4. Remove Unused Apps, Software & Bloatware
While many programs and processes are important to keep, you should delete any apps you no longer use. You’ll also want to remove the “bloatware” that comes pre-installed on most computers these days — sponsored apps and utilities that you have no real use for.
To remove unused programs and bloatware, right-click on the Windows Start button on the lower-left corner of your screen and choose “Apps and Features”. This will bring up a list of all of your computer’s installed software. From there, it’s easy to uninstall programs you don’t need and stop them from using your PC’s resources.
Alternatively, you can use antivirus software that comes with device optimization features (like TotalAV, see #3) to find and remove unnecessary programs, duplicate files, caches and cookies, and speed up your computer.
5. Delete Large Files (Manually & With Disk Cleanup)
After years of use, a lot of your computer’s storage may include data like:
- Leftover files from program installs.
- Offline web pages.
- Temporary files.
- Setup log files.
- File compression.
- And more…
Eventually, these files will build up into “monster files” that make your computer work harder due to the sheer size of them.
Removing these files can take anywhere from a few minutes to an hour (or even longer), depending on their size. To avoid the long wait, try cleaning unnecessary files regularly — or even after completing every task.
To do this, right-click the Windows Start button and open the File Explorer. Then make sure it’s showing “This PC” in the main location bar.
Using the search box in the top right-hand corner, type “size:empty”. This will return results for files that are 0 bytes and open the main search tools window. You can then click on the “Size” tab and choose any size from “Empty” to “Gigantic”. Search for the “Large”, “Huge”, and “Gigantic” files and delete any that are unimportant. Delete the files by simply right-clicking on the file and hitting “Delete”.

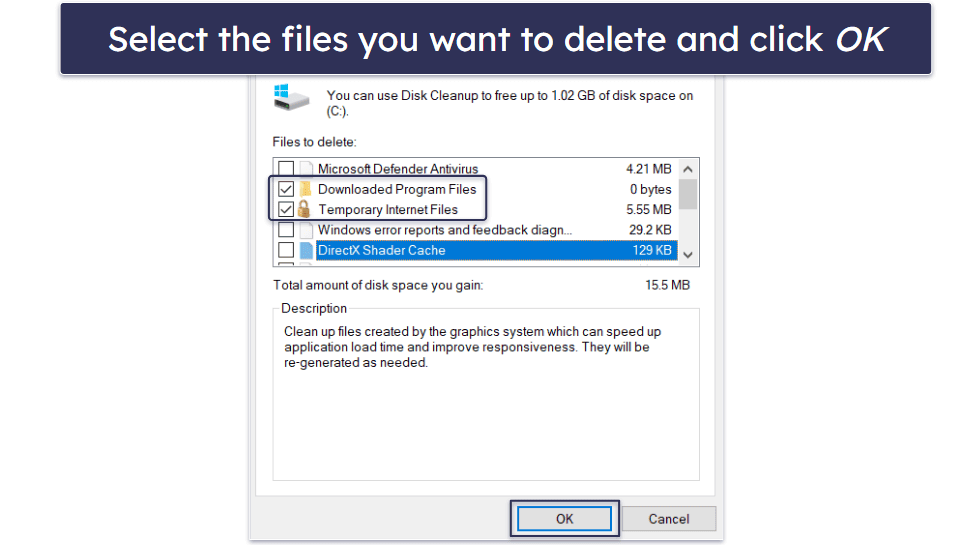
Alternatively, you can use the free built-in Disk Cleanup app in Windows to help you sort out your digital clutter.
Type “Disk Cleanup” in the search box next to the Windows icon and click on the app with the same name from the list of results.
A new window will open showing you all the files you can delete and the space you´ll free up. You can also hit “Clean up system files” to run the search again. Then, under “Files to delete”, select the files you want to get rid of and hit “OK” to delete them.
Pretty much everything should be safe to delete, but I’d recommend keeping “Windows ESD installation files” if this option appears (depending on which version of Windows you have) — these files are used to reset your PC, so if you delete these and ever need a complete reset, it will be a pain.
You can also click on “View Files” (where it’s available) to check exactly what will be deleted from the other categories. For example, you might want to review the Recycle Bin before permanently deleting everything there.
Keep in mind that these kinds of files accumulate real fast, so it’s important to regularly delete them from your hard drive.
6. Delete Old Files & Downloads
The Disk Cleanup utility is perfect for deleting files you never even knew were taking up space, but chances are you have even more old files that can be deleted in order to free up disk space.
The biggest culprits to look at are photos, videos, and files in your Downloads folder. Over the course of several years, your Downloads folder accumulates photos, documents, and email attachments that you might no longer need — and they take up a ton of room on your computer’s hard drive.
Consider moving some files to a cloud storage platform, like OneDrive, or backing up files onto a separate drive to free up space on your main computer’s storage. This can significantly improve your computer speed.
Backing up files also protects you in case your hard drive fails, you lose your computer, or if other damages occur.
You can use OneDrive to keep anything you don’t need to access often. It’s already built into the Windows operating system, it’s easy to use, and it’s free.
To manage your OneDrive, open the File Explorer, right-click “OneDrive”, and click on “Settings”.
You can manage all the settings there, including when and where to backup old and unused files. If you want to delete something off of your computer but save it to OneDrive, make sure it’s synced to the OneDrive cloud before you delete it off of your computer.
Top antivirus suites like Norton 360 also include secure cloud storage, which is another option. Norton isn’t free, but given it comes with performance optimization tools and 100% effective malware protection, plus a whole heap of other features, it’s a great value and highly convenient option for keeping your PC safe and fast. It also comes with a 60-day money-back guarantee, so you can try it out totally risk free.
7. Empty Your Recycle Bin
It’s important to regularly empty the Recycle Bin to fully remove deleted files from your system.
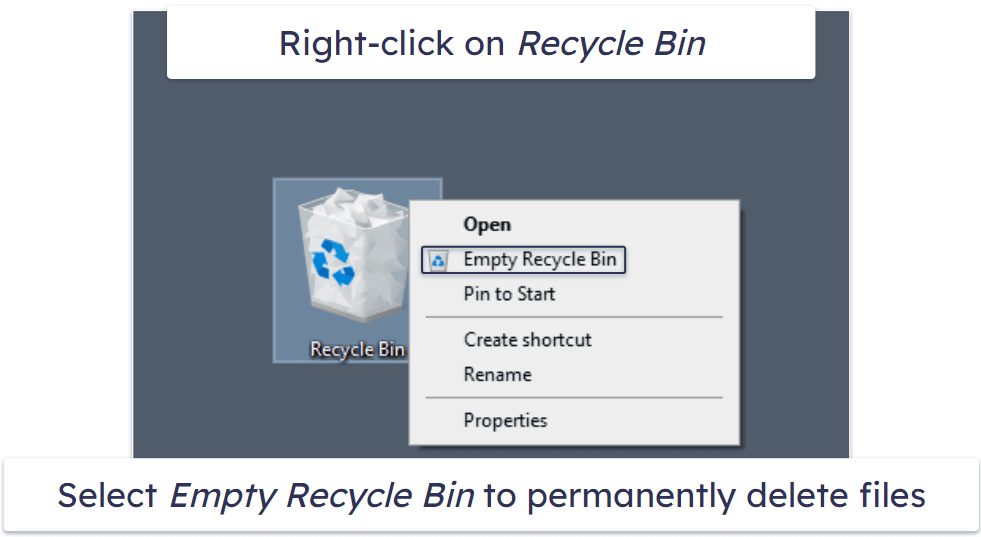
Just be aware that when you empty the Recycle Bin, this permanently removes the files from your PC, they’re gone forever — unless you’ve backed them up onto your external hard drive or to a cloud storage platform.
8. Remove Unused Browser Extensions
If your internet browser is running slow, that might be because you have too many extensions running at the same time.
Removing extensions that you don’t need saves computer memory, thereby speeding up its overall performance.
If you’re using Google Chrome, simply click on the puzzle-shaped extensions icon in the top right of your browser, then click on the 3 dots to the right of any extension you want to remove, and hit “Remove from Chrome”.
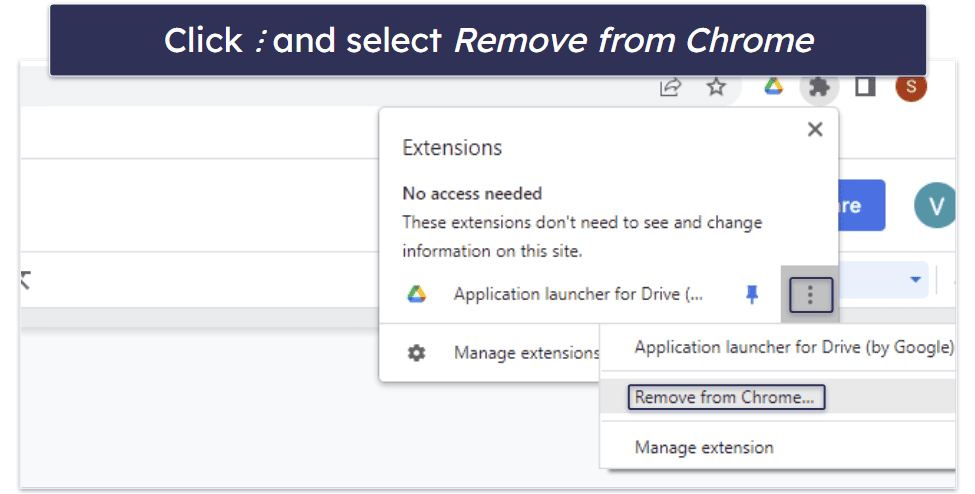
The process is the same for Microsoft Edge.
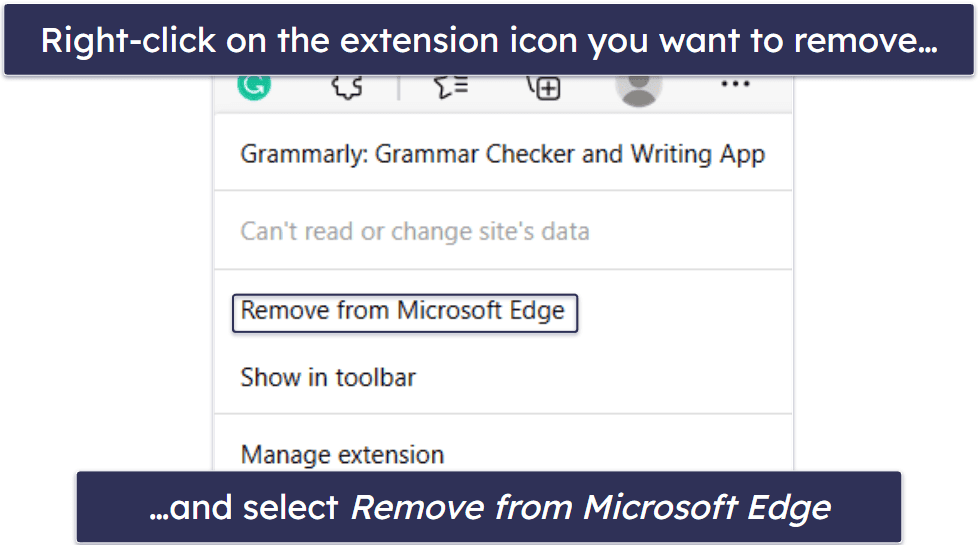
If you see any extension you don’t recognize or don’t use, you should immediately uninstall it.
This method applies even to tiny browser extensions that may look harmless at first but can significantly eat up your computer’s memory.
In general, anything that doesn’t need to be on your computer should be removed, and that includes browser extensions.
9. Clear Browser Cache, History & Temporary Internet Files
Unless you have a specific need to keep track of your browser history, you should regularly clear it out. This will prevent your computer and web browser from lagging. When clearing your browsing data, you should also clear cookies, cached images, and other temporary files.
In Chrome, go to the main Chrome menu (3 vertical dots) on the upper right-hand corner of your browser window and click on “History”. This opens a new window — select “Clear browsing data” from the left-hand menu and another pop-up will appear showing you the type of browsing data you can clear.
Choose the data you want to delete, and the time range — “All time” is the best, particularly if you´ve not done it before — and then hit “Clear data”.
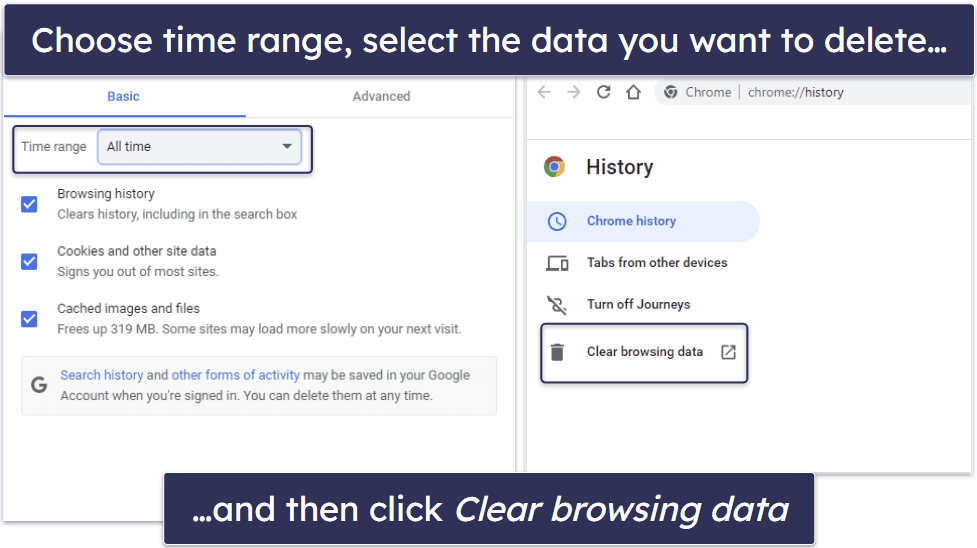
The process is pretty much the same for most browsers — just go into your browser settings and clear the history.
Alternatively, you can use third-party tools like TotalAV, which doesn’t only offer safe browsing with antivirus protection but also cleans cookies and browsing history with a couple of clicks.
To maintain stable computer speed, make a habit of regularly clearing browser cache, history, and temporary internet files.
10. Optimize Startup Applications With the Task Manager
You can manage what startup programs you want to be running in the background using the Task Manager.
Open the Task Manager and choose the “Startup” tab. You’ll see a list of all of the programs that launch every time your computer turns on (along with each program’s impact on startup speed).
Identify any that you don’t need to automatically launch at startup, particularly those with a “High” impact, and remove them from the list by clicking on the program and then hitting “Disable”.
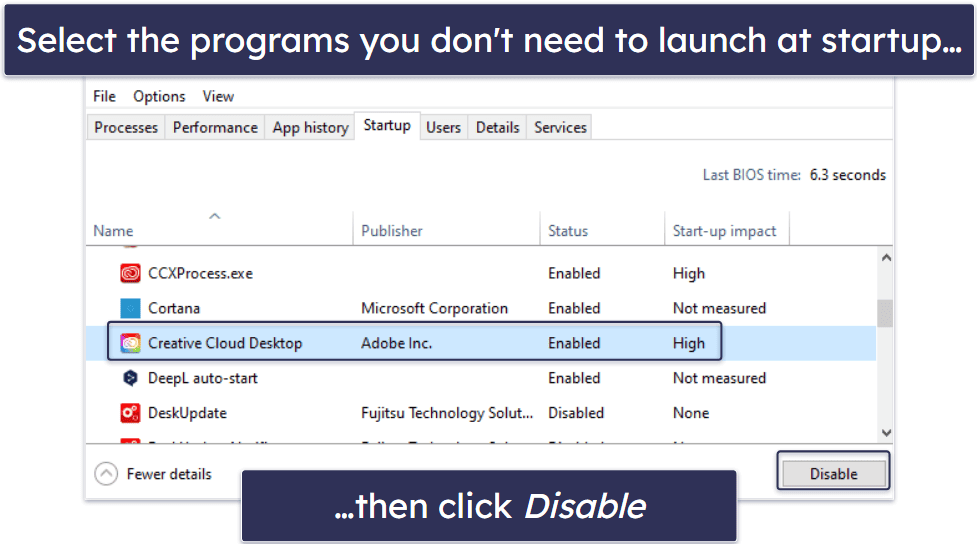
Again, antiviruses like TotalAV make this process easy by letting you easily enable and disable startup programs from the software’s main interface.
11. Turn Off Search Indexing
To help you find the files and programs you need, Windows PCs keep an up-to-date index of all of your drives. Ironically, building this index takes up system resources (especially for low-powered PCs) and can slow down your computer’s performance. But you can always turn off or tweak search indexing.
To turn off search indexing, open the “Indexing Options Control Panel” by typing “index” in the Start button search box and then clicking on the app from the search results.
A pop-up will open, click on “Modify”, which will then open a second window called “Indexed Locations”. From there, deselect all of your computer’s drives if you don’t want them to be indexed.
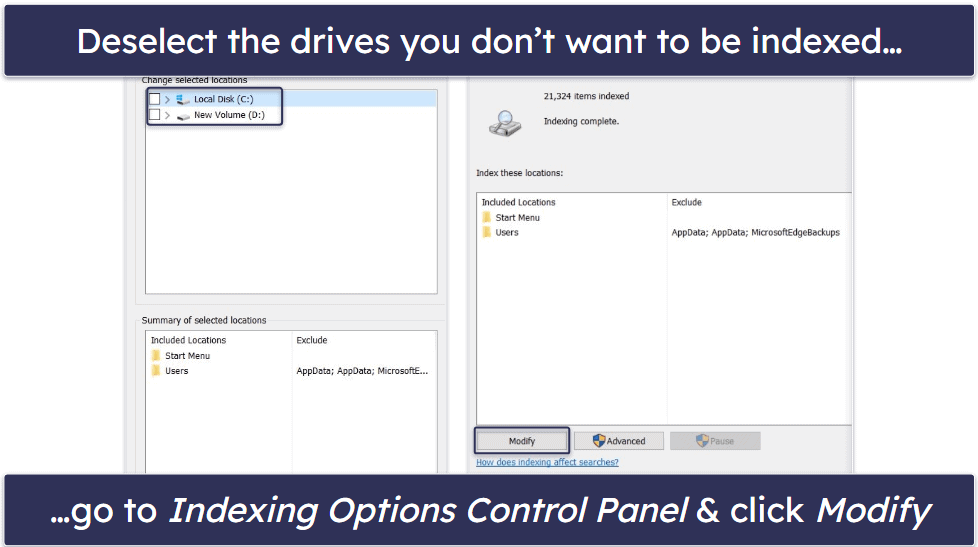
After this process, your Windows Search indexing is fully disabled. Your searches will take longer, but your computer won’t be bogged down by trying to continuously build and update indexes of all of your files. You can always turn it back on again if there’s any problem with the search performance.
12. Check for Malware, Adware & Spyware
Reputable antivirus software can help protect your PC by scanning for and removing threats. The best antiviruses include real-time protection to block malware from entering your system in the first place.
There are many free antiviruses available, but most of them lack the comprehensive malware and internet security protections that will keep your devices 100% safe. However, many top antiviruses come at affordable prices, and they all come with money-back guarantees, so you can even purchase the product, check/clean your device, and then cancel your subscription before the money-back guarantee is over.
My favorite antivirus is Norton 360 — it’s got 100% malware detection/removal rates along with one of the best device optimizers on the market. TotalAV is also a really good option as it comes with a range of useful additional features, including device optimization tools that are easy to use for non-technical users.
13. Run the Troubleshooter
Sometimes there are hidden settings that are impacting performance, and you can find and fix problems with some general troubleshooting.
Type “troubleshoot” in the search bar and click on “Troubleshoot settings” from the list of results. If there are any recommended troubleshooters, these will be shown at the top of the window that opens. If not, you can manually run troubleshooters on lots of different areas — depending on your version of Windows, these will be behind an “Additional troubleshooters” link or at the bottom of the main window. Click on each one of the areas in the troubleshoot list and click “Run the troubleshooter” to analyze your system for issues.

The utility will mainly look for the issues I already covered on this list, but it should also find some things that might be impacting performance (like a hidden power setting or video setting).
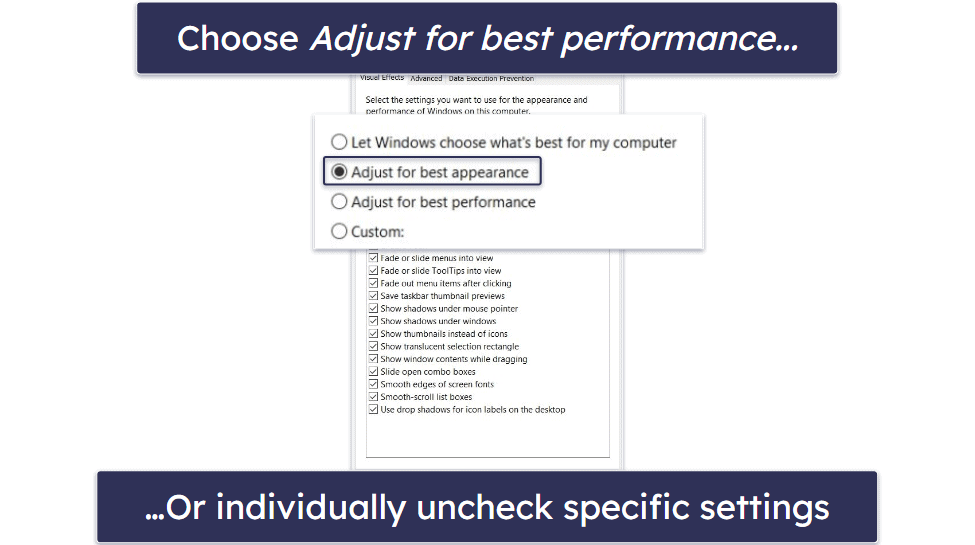
14. Adjust Appearance & Visual Settings
Adjusting your computer’s visualizations likely won’t dramatically improve performance, but it could help in some cases.
Type “appearance” into the Windows search box and click on “Adjust the appearance and performance of Windows” from the results that appear — this will open the “Performance Options” dialog box.
You can either uncheck specific appearance settings or just choose the setting “Adjust for best performance”. This causes you to lose all of your system’s visual effects (like fades and animations) which may help with speed a little bit.
15. Change Your PC’s Power Settings
Your computer sometimes reserves a little bit of performance in order to save energy, especially in the case of laptops that aren’t connected to a power outlet.
Changing your PC’s power settings is easy. Simply click on the battery icon in your Windows tray and slide the slider to “Best Performance”.
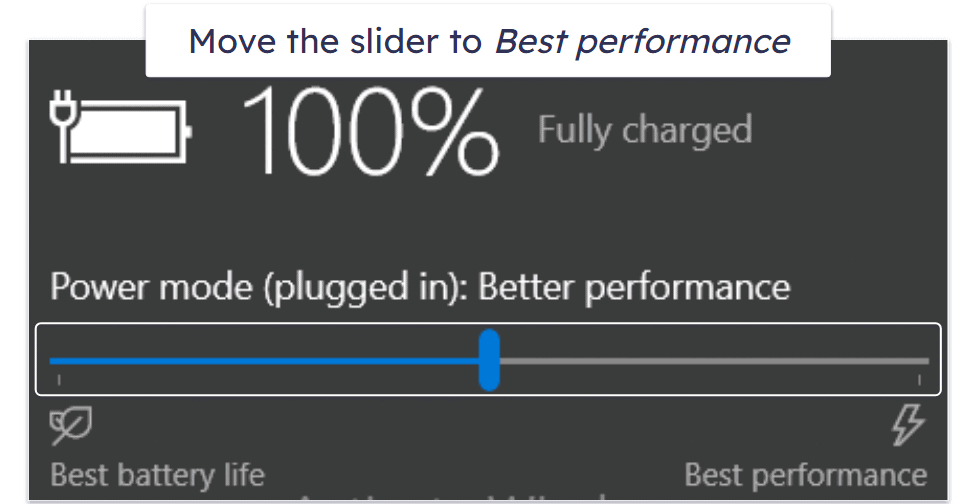
Just bear in mind that this will drain your battery faster if you’re not connected to a power outlet.
16. Scan Your Hard Drive for Errors
One possible cause of a PC slowdown is an error in the way your hard drive stores and accesses data. Luckily, Windows has a built-in utility that helps scan and fix hard drive problems like bad sectors, lost clusters, or directory errors.
To check for hard drive errors, open the File Explorer by right-clicking on the Windows icon. In the window that opens, right-click on your local disk (usually the C: drive) shown under “Devices and drives” and choose “Properties”. Another pop-up will appear: go into the “Tools” tab and then click “Check”.
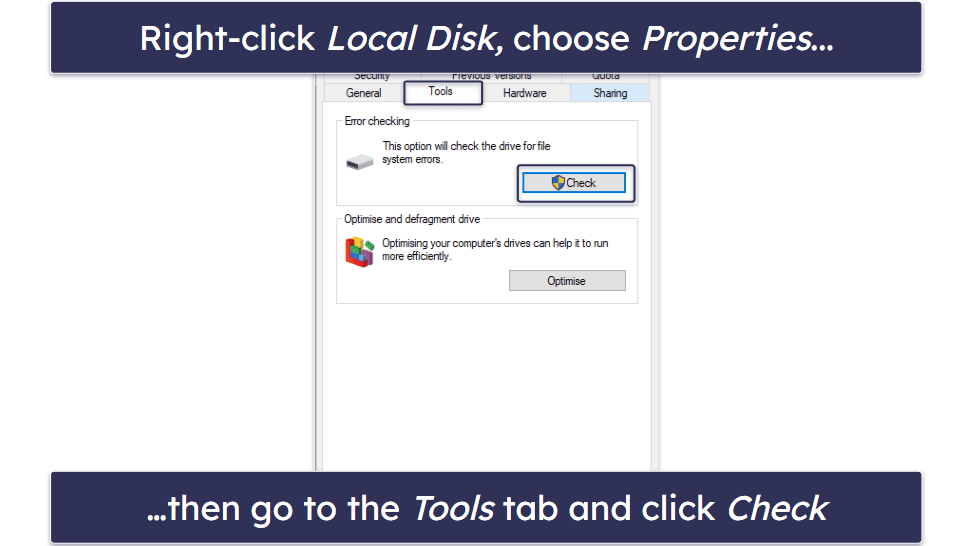
Some computers will start the scan automatically, but your computer may have two options — “Scan for and attempt recovery of bad sectors”, which is on by default, and “Automatically fix file system errors”, which is unchecked by default. Tick “Automatically fix file system errors”.
The scan may take a couple of minutes to complete.
Your PC will inform you whether everything is okay or if there are errors to fix.
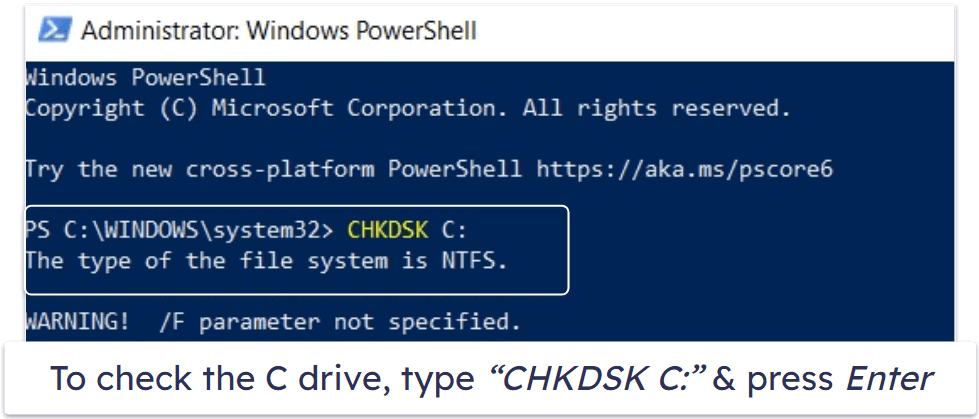
Alternatively, you can also run CHKDSK via the command prompt window. Right-click the Start icon in the lower-left corner, then select “Windows PowerShell (Admin)”. In the command prompt window, type in “CHKDSK”, then a space, followed by the disk you want to check. So to check the C drive, type “CHKDSK C:” and then press enter.
Whichever one you prefer, both methods will help you scan your hard drive for errors.
17. Defragment Your Hard Drive (HDD only)
Defragmenting your hard drive basically means better organizing the data it stores. Older-style HDDs (hard disk drives) get a little messy and chaotic over time as they move bits of data around. Defragmenting helps sort the data and puts it where it should be, making it easier and faster to access.
Try this method if all of the earlier solutions aren’t effective enough in speeding up your computer.
This process may take several hours to complete, depending on the size of the file storage.
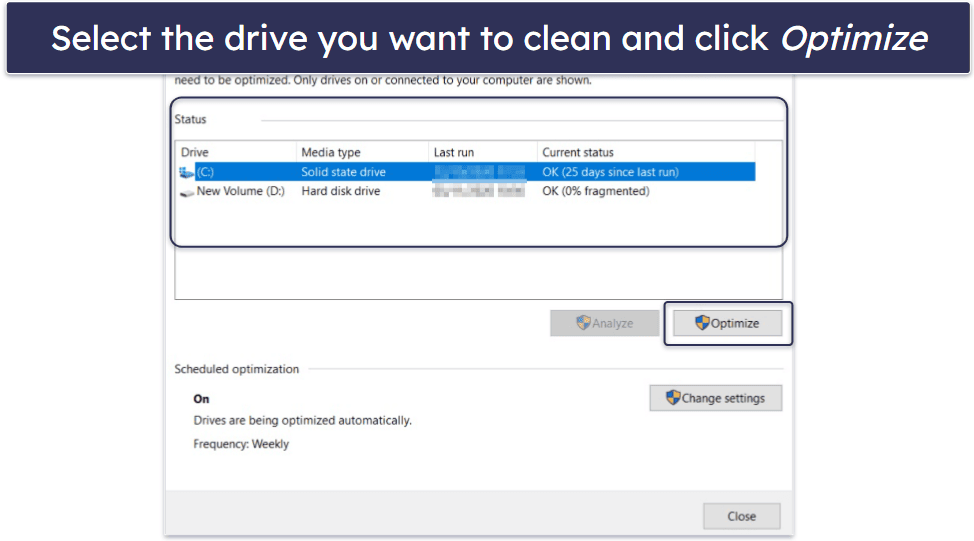
All you have to do to defrag your HDD is type “defrag” in the Windows search box and open the “Defragment and Optimize Drives” app from the results list. When you open the app, choose the drive you want to clean up and hit “Optimize”.
Important: You shouldn’t perform this method on Solid State Drives (SSDs). That’s because defragmentation can cause unnecessary wear and tear to an SSD. This can lower the lifespan of the SSD.
18. Reinstall Windows
If your computer is severely slowed down, consider starting again with a fresh version of Windows. You can do this from home and you won’t need to pay for a new version of Windows if you already have Windows installed and activated. But installation can take up to a few hours, and you will need to reinstall all of your apps and settings (and maybe even your files).
Before you do this, first back up all of your files. A full reinstall wipes your entire drive, which means you’ll permanently lose any files you’ve not backed up. There is another option for a reinstall that keeps your apps and files, but it is still a good idea to fully back up everything beforehand, to be safe.
Then, go into your computer’s “Settings” panel and click on “Update & Security”. Then click on “Recovery” and then “Get started” under “Reset this PC”.
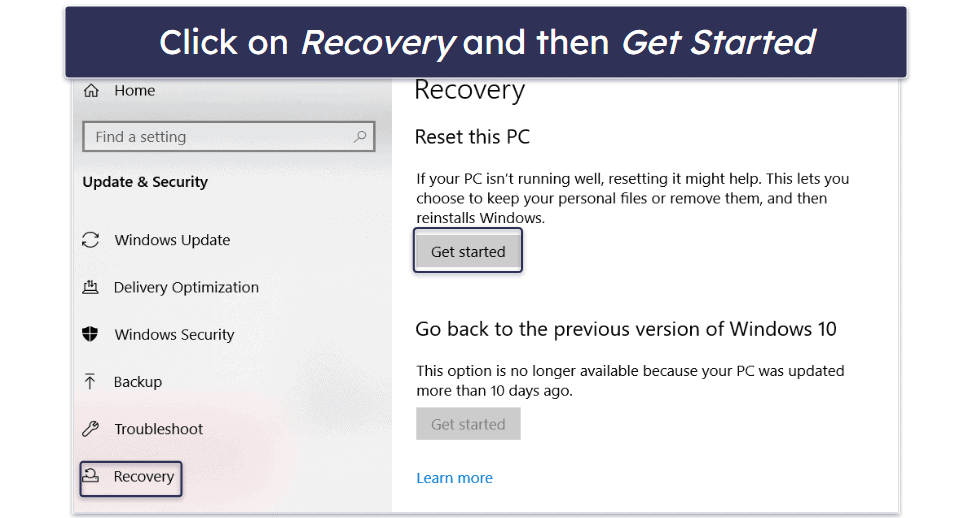
You’ll have the option to “Keep my files”, which will only remove apps and settings, or “Remove everything”, which will completely remove all files, apps, and settings.
Regardless of which one you choose, make sure that your files are backed up.
19. Overclock Your CPU
Overclocking essentially means forcing your CPU components to run faster than they were designed to. This method can be a bit dangerous, as overclocking can cause processors to overheat and become damaged. It may not even be possible to overclock your CPU if the motherboard is locked.
Overclocking can also be very time-consuming and expensive if you mess up the CPU in the process.
For most users, this option wouldn’t be advisable. However, for those with technical expertise and experience in computer upgrades, it could be a worthwhile consideration.
Before overclocking your CPU, you’ll need to upgrade your computer’s cooling system (with a higher-powered fan) and update the clock rate via the BIOS.
If you have the experience and know-how, this is a clever, backdoor way to speed up a computer.
20. Upgrade Your Computer’s Hardware
Should all software remedies prove unsuccessful, it might be mechanical problems that are limiting your computer’s functionality. There’s a chance that certain parts of your computer are too old and can’t meet the requirements of contemporary apps and tasks.
Upgrading certain computer components can boost system performance. While desktop PCs are typically more upgrade-friendly than laptops, make sure to consult your manufacturer before making any changes.
You have a few options here, depending on what’s causing your computer’s slowdown:
- Upgrade your computer’s RAM to handle more tasks at the same time.
- Switch your HDD for an SSD for faster and easier access to files and shorter load times.
- Upgrade your GPU (graphics processor) for a better experience with gaming and high-definition video.
It’s always best to seek professional advice and assistance when upgrading your computer’s RAM, hard drive, GPU, or any other components.


