
Published on: September 8, 2021 Updated 6 times since publishing
Short on time? Here’s how to remove the “Virus Alert from Microsoft” scam:
- 1. Close Your Web Browser. “Virus Alert from Microsoft” always appears in web browsers. So first, try to close your web browser normally. If that doesn’t work, press “Ctrl+Shift+Delete” to open your Task Manager. Find your web browser among the running processes and click “End Task” to force it to close.
- 2. Remove Suspicious Extensions and Reset Your Browser. Check your browser for any extensions or add-ons you don’t remember installing. Remove anything that looks unfamiliar. Then, reset your browser to its default settings to erase any changes made by unwanted software.
- 3. Scan Your Computer. The next step is to run a full disk scan using a premium antivirus (Norton is my favorite).
- 4. Remove Malware and Potentially Unwanted Programs (PUPs). After the scan is complete, let the antivirus remove all the malware and PUPs it finds.
- 5. Stay Protected. To stay safe from further infections, you should invest in a premium internet security suite like Norton, which offers perfect malware detection rates, real-time and anti-phishing protection, and much more. Norton has a variety of affordable plans, and they all come with a generous 60-day money-back guarantee.
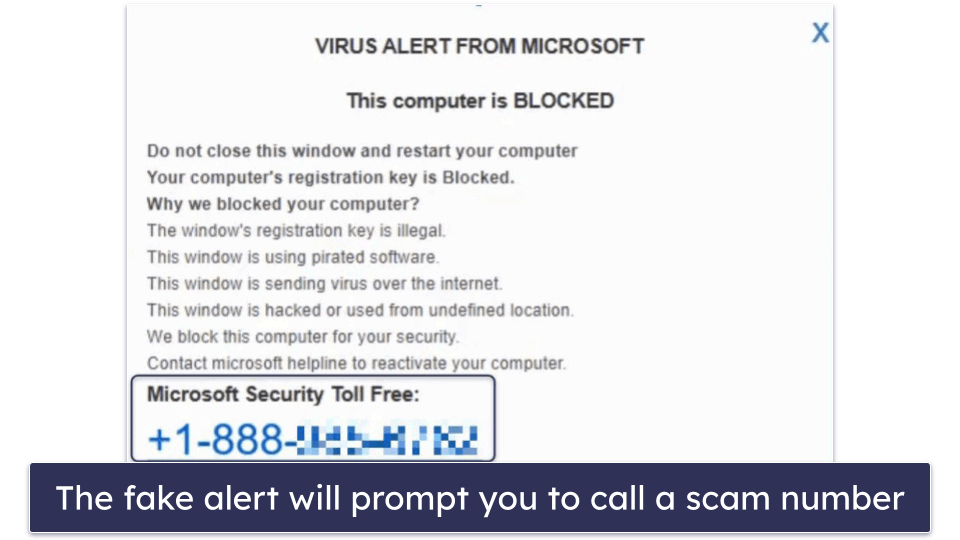
“Virus Alert from Microsoft” is a scam developed by hackers to break into your computer. So, if you see a pop-up window in your web browser that says “Virus Alert from Microsoft”, it means you’re on a website that hosts dangerous pop-ups, or you have malware infecting your computer.
To remove the pop-up, follow the below steps and run a full system scan with a trustworthy antivirus. A good internet security program like Norton can remove malware from your system, block unsafe sites, and ensure that your incoming and outgoing web traffic isn’t compromised by hackers.
Note: The “Virus Alert from Microsoft” pop-up usually contains a phone number to connect you with scammers. Whatever you do, don’t call the number on the virus alert.
Preliminary Step: Close the “Virus Alert from Microsoft” Notification
The “Virus Alert from Microsoft” notification will always appear in your web browser. Even if you’re not surfing the web, malware on your PC can open your web browser and redirect you to the fake “Virus Alert from Microsoft” web page.
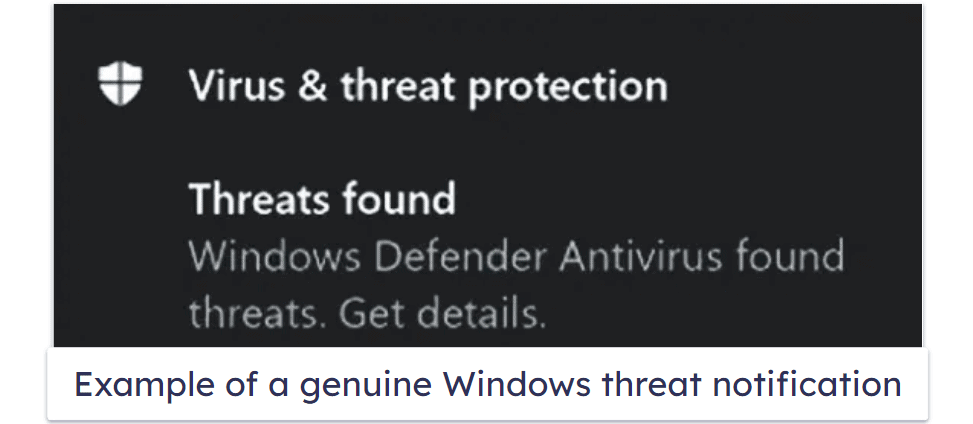
This web page isn’t a genuine notification from Microsoft. In fact, a real notification from Microsoft will look like this:
To better disguise itself, the fake web page will sometimes force your browser into full screen mode to try and hide the fact it’s actually your web browser and not Microsoft showing the notification.
If this is the case, press “F11” on your keyboard to bring your web browser back to windowed mode. You should then try to close your web browser normally by pressing the “X” symbol in the top right corner of the browser or by hitting “Alt+F4” on your keyboard.
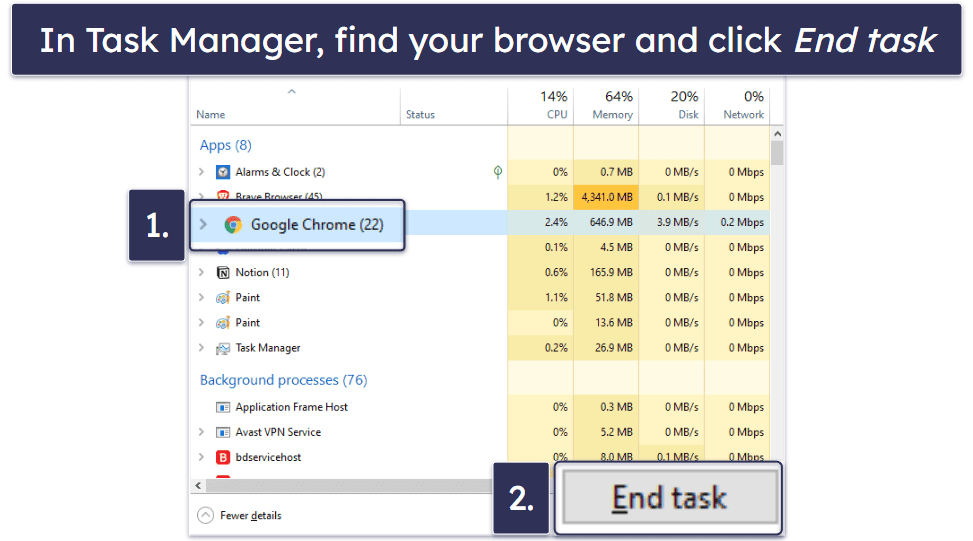
Sometimes, the “Virus Alert from Microsoft” pop-up will keep reappearing even when you try to close the tab on your web browser. That’s because malware on your device is constantly issuing the pop-up every time you hit the “X” button, making the “Virus Alert from Microsoft” tab impossible to close.
In this case, you should fully close your web browser through your computer’s Task Manager. To do this, hit “Ctrl+Shift+Esc” on your keyboard. When the Task Manager has opened, navigate through the running processes until you see the web browser showing the “Virus Alert from Microsoft” notification. Click on it and then click End Task.
Once this is done, the notification will be gone. You should then reopen your browser and check for potential issues. I recommend removing any suspicious extensions first.
Preliminary Step 2: Remove Suspicious Extensions and Reset Your Browser
The next steps will show you how to remove suspicious extensions from your web browser.
Removing Extensions From Chrome
To eliminate the “Virus Alert From Microsoft” pop-up ads in Chrome, follow these steps:
- Locate and click on the 3 vertical dots at the top right-hand corner of your browser.

- Select Extensions, then Manage Extensions from the submenu.

- Identify any extensions that appear unusual or unfamiliar and click Remove beside those extensions.

Once you’ve removed all suspicious extensions, your computer should be free of errors. If it’s not, you’ll have to reset your browser. Here are my instructions for resetting your browser using Chrome. That said, if the issue is resolved, you can skip to Step 1.
Removing Extensions From Firefox
Removing rogue Firefox extensions is straightforward, much like the process in Chrome.
- First, click on the extensions icon, which resembles a puzzle piece.

- Then, select Extensions.

- Finally, use the 3 dots menu to remove any unwanted extensions.

Once you’ve removed all suspicious extensions from Firefox, your computer should be free of errors, and you can skip to Step 1. If it’s not, you should try resetting your browser. Here’s how to do that in Firefox.
Removing Extensions From Edge
- Click the extensions icon, then “Manage extensions”.

- Remove any extensions that look suspicious to you.

If this solves your issue, you can skip to Step 1. Otherwise, continue to the section below.
Reset Your Browser Settings
If you still have problems after removing suspect extensions, you should try resetting your browser’s default settings. This will remove all extensions from your browser.
The process of resetting your browser will differ depending on your browser:
- Restore your browser settings on Chrome.
- Restore your browser settings on Firefox.
- Restore your browser settings on Edge.
Restoring Your Browser Settings on Chrome
- Start by clicking on the 3 vertical dots in your browser. Then click Settings > Reset settings.

- Click Restore settings to their original defaults and confirm your choice when prompted.

- You can now move on to scanning your computer with an antivirus.
Restoring Your Browser Settings on Firefox
- Restoring your browser settings on Firefox is equally simple. Just click on the 3 horizontal lines, then “Help”. In “Help”, click Troubleshooting Information.

- Then click Refresh Firefox at the top right. Confirm your choice.

- You can now scan your computer using an antivirus program.
Restoring Your Browser Settings on Edge
- In Edge, select the 3 dots located in the top-right corner, followed by choosing Settings.

- Use the search bar to enter “Restore” — when the option appears, select Restore settings to their default values.

- Move onto step 1, scanning your computer using an antivirus program.
Step 1. Identify the “Virus Alert From Microsoft” Infection With Your Antivirus (And Don’t Make the Problem Worse!)
IMPORTANT: Never connect a tablet, cell phone, or USB device to your computer if you suspect that it has a malware infection. If you do, there’s a chance that a malware infection will copy itself onto the connected device.
Once you’ve installed a comprehensive antivirus program like Norton, run a full virus scan of your device. A full virus scan will check everywhere on your computer for malware. The virus scanner will quarantine any malware it finds and then allow you to remove it from your system. This includes rootkits, worms, spyware, and other threats that often run undetected.

Remember: Run the entirety of the virus scan. Since malware replicates, it’s impossible to know how many copies of malware you have on your system. If you cancel the virus scan before it hits 100%, the malware will continue to replicate and still infect your system. Unfortunately, this means you’ll likely start getting the “Virus Alert from Microsoft” pop-up again.
The full scan can take anywhere between 1 and 4 hours. Your PC may run slowly while running the scan since virus scans can be CPU-demanding. A good idea is to schedule the scan at night. Then, you can leave your PC until the following morning, when the scan will be completed.
When your antivirus finishes scanning, a notification will appear showing the results. All malware on your system will be identified and quarantined. You can now proceed to Step 2.

Step 2. Remove the “Virus Alert from Microsoft” Infection and Delete Any Other Infected Files
Sometimes, your antivirus won’t detect any compromised files. This means you’ve just accidentally visited a dangerous website, but malware hasn’t infected your device. If this is the case, you can skip ahead to keeping your device protected.
If your antivirus found malware on your system, you should go through the infected file list and hit the Delete button on every compromised file. If you’re an advanced user, you can scroll through the list of infected files and whitelist any false positives you see.

Once you’ve removed or whitelisted everything on your quarantine list, restart your computer to stop any infected processes loaded into your system memory from running.
You can then run a second scan using your antivirus scanner. This preventative step ensures all traces of malware are removed. Your antivirus shouldn’t take as long this time around. Many antiviruses (such as Norton) remember which files they previously scanned. This means they can analyze your disk much faster on a second full disk scan.
Like on your first scan, let your antivirus completely finish its second scan. Once the scan is finished, the infected file list should be empty. If any compromised files do appear, review them as before and delete them as necessary. Once this is done, your computer is malware-free.
However, despite removing the “Virus Alert from Microsoft”, your computer is still at risk of the millions of malware files on the web that you can accidentally download.
Step 3. Keep Your Device Protected Against Dangerous Websites
Cybercriminals develop new malware daily, meaning it’s very easy to accidentally download infected files. There’s also a considerable risk of having your online data harvested, losing your personal information to identity theft, or having your accounts compromised by public Wi-Fi hackers. With all this in mind, you might be wondering how to keep your devices and personal information safe. Luckily, there are several steps you can take:
- Install an Ad Blocker. Installing a good ad blocker is crucial for enhancing online security against threats like the “Virus Alert from Microsoft” scam. Ad blockers prevent the display of malicious ads that can deceive users into believing their device is infected, prompting them to download harmful software or provide personal information. By blocking these ads, ad blockers reduce the risk of encountering malware and phishing attempts, which are often disguised as legitimate warnings. Furthermore, ad blockers can improve browsing speed and protect against unwanted trackers, contributing to both safer and more efficient internet usage.
- Don’t Download Suspicious Files. Ensure you recognize where the files you download are coming from. Don’t download pirated content or freeware from untrustworthy websites. With email, even if a file is on an attachment from an email address you trust, ensure the email has been sent intentionally. Some phishing scams can hijack emails and spread malware through trusted email accounts.
- Keep Your Software, OS, and Drivers Up-To-Date. Hackers have frequently taken advantage of software vulnerabilities to gain access to computers. Most of the time, developers release software updates with security patches that fix these vulnerabilities. Download a comprehensive antivirus suite that includes a vulnerability scanner that can automatically scan your programs, drivers, and OS to ensure they’re up to date.
- Use Strong Passwords For All of Your Accounts. If you want your accounts to stay private, use strong and unique passwords. Each should be impossible to guess and include letters, numbers, and other characters. Don’t use the same password for any two accounts. Luckily, you don’t actually have to memorize dozens of unique passwords for this; you can use a secure password manager like 1Password to keep your information private.
- Secure Your Wireless Network and IoT Devices. You should ensure your Wi-Fi network and Internet of Things (IoT) devices are secured with a strong password. Again, I recommend using a password manager such as 1Password. 1Password can generate strong passwords and store them, so you never have to worry about remembering passwords.
- Install a Secure Antivirus Program. There are many antiviruses on the market, but you have to pick the right one. To make an informed decision, check out 2026’s best antivirus packages here. My personal favorite is Norton 360. Its antivirus scanner uses advanced heuristics, artificial intelligence, and an extensive malware database that’s updated daily to stay ahead of the newest malware.
Quick Summary of the Best Antiviruses for Removing Microsoft Virus Alert


Frequently Asked Questions
How do I remove Microsoft Virus Alert from my PC?
The best way to remove the Microsoft Virus alert from your PC is to follow our above steps. In short, you need to download a comprehensive antivirus program like Norton and run a full system scan. Norton will look for all traces of malware causing your computer to issue the fake virus alert from Microsoft. Once you’ve removed all malware, you should keep running Norton for its additional security features or choose another antivirus program with good web protection.
Will Microsoft alert you if you have a virus?
Yes, Microsoft will alert you if you have a virus. However, Microsoft won’t alert you through your web browser or ask you to dial a number. If you receive a fake notification from Microsoft asking you to dial a number, you should follow our steps to close the fake virus alert and remove it.
If you do have malware on your computer and Microsoft detects it, Windows Defender will alert you through your computer’s notification menu. You’ll then be prompted to run a virus scan via Windows Defender, but it’s a good idea to instead choose an alternative antivirus suite like Norton, as it comes with better malware detection rates.
What does “Virus Alert from Microsoft” mean?
The pop-up titled “Virus Alert from Microsoft” is a scam allowing cybercriminals to gain access to your computer. While Windows does feature an embedded antivirus, its alerts never display the message “Virus Alert from Microsoft.”
If you see “Virus Alert from Microsoft” on your computer, you’re either on a sketchy website that is trying to hack your device or you have a malware file on your computer that is issuing false pop-ups.
You need to download a comprehensive antivirus like Norton to determine if you have malware on your system and protect your device when you’re online. A high-quality antivirus will scan your PC for threats and safely remove them. Follow our simple steps to learn how to do this.
Is “Virus Alert from Microsoft” real?
No! If you see this notification appear or receive the “Virus Alert from Microsoft” pop-up, you should download a comprehensive antivirus like Norton and follow our steps to run a full system scan. Microsoft will never show a virus alert in a web browser pop-up window or ask you to call a phone number to resolve virus threats.
Nevertheless, Microsoft provides authentic virus protection for your computer. Windows Defender operates seamlessly in the background and only notifies you when it detects a potential threat (with a push notification in your screen’s corner). This alert informs you of the possible danger and directs you to the Windows Defender Security Center for additional actions.
How did “Virus Alert from Microsoft” get on my computer?
Shady websites or malware are responsible for this type of message. Many people accept money from scammers to host these kinds of pop-ups on their sites. Alternatively, there could be malware already downloaded on your device, causing this window to constantly reappear. This can be hard to get rid of, so I recommend getting an antivirus like Norton and running a scan right away.
I provided my personal info to scammers — what should I do now?
You need to take immediate action if you’ve given any info to scammers. If you’ve provided financial information, contact your bank immediately and let them know. Even if you’ve only given out your name or address, you should be careful. I recommend downloading an antivirus right away and practicing good cyber hygiene going forward. Norton also provides dark web monitoring to customers in several countries, and users in select countries can even get identity theft protection, which includes legal help and credit monitoring.
Ultimately, it depends on what information you’ve given out, but changing your passwords and running scans on all of your devices is definitely advisable.
How to identify a pop-up scam?
If a pop-up is asking you to do something immediately, it’s probably a scam. You should also be suspicious of any message that tells you to call a phone number. Companies like Windows and Google have other means of contacting you, and they’ll always use more official channels. Pop-ups loaded with flashing lights and spelling mistakes are also highly suspect.
Use your best judgment, but I also recommend running an antivirus like Norton, which will warn you about scams and malware.
How to remove “Virus Alert from Microsoft”?
If you’re getting the “Virus Alert from Microsoft” pop-up, immediately close your browser and consider installing a trusted antivirus, like Norton. This will ensure a thorough system scan, rooting out any rogue software causing the alert.
Follow our above steps to learn how to scan your PC using an antivirus like Norton. This process will guide you through removing all traces of malware you have on your system, including the malware causing the “Virus Alert from Microsoft” pop-up.


