
Published on: April 25, 2024 Updated 2 times since publishing
Short on time? Here’s how to remove the random music playing virus:
- Scan Device. Run a full system scan with a high-quality antivirus (Norton is the best).
- Remove Virus. After the scan is complete, let the antivirus remove all instances of the potentially unwanted program (PUP).
- Stay Protected. Protect yourself from further infections with a high-quality internet security package.
Technically, the random music-playing virus isn’t a virus at all; it’s either a tab or application you’ve forgotten to close or a potentially unwanted program (PUP) that was downloaded onto your device. If it’s a potentially unwanted program, hackers likely smuggled it into a free download, where it can lie dormant for a long time before activating.
PUPs can be particularly tricky to get rid of on your own since the files can repopulate and usually indicate a larger spyware or adware infection. If left alone, this infection can introduce other malware onto your computer, cause constant redirects when opening your browser, and, worst of all, get an incredibly catchy song stuck in your head!
So, unless the music is coming from something as simple as a forgotten browser tab or background app, getting rid of it yourself can range from frustrating to downright impossible without years of technical training. The best way to remove the random-music-playing virus (if it is indeed a virus) is by using an excellent antivirus program like Norton to scan your device.
Norton comes with a flawless scanner and additional tools like a secure browser that can protect you from PUPs. Since it comes with a risk-free 60-day money-back guarantee, you can try it out before committing.
Preliminary Step 1. Make Sure the Random Music Is Actually Malicious
Before I jump into the technical details, check your browser tabs, apps, and audio mixer to ensure the random music is actually malicious. Speaking from experience, sometimes random music starts coming from one of my many browser tabs — leaving me scrambling to figure out which. I’ve also left a music-playing app like Spotify running in the background and found myself wondering why my favorite album starts playing every time I open my laptop.
To make sure the music isn’t caused by simple user error, start by looking through your browser tabs. Open your regular browsers and look through each one. If one is playing music, it will display an icon that looks like a speaker.

Simply close that tab by clicking on the X icon located on the browser tab or in the top right and the music should stop playing. Even if it’s a website that doesn’t normally play music, some ads displayed on the website may start playing music.
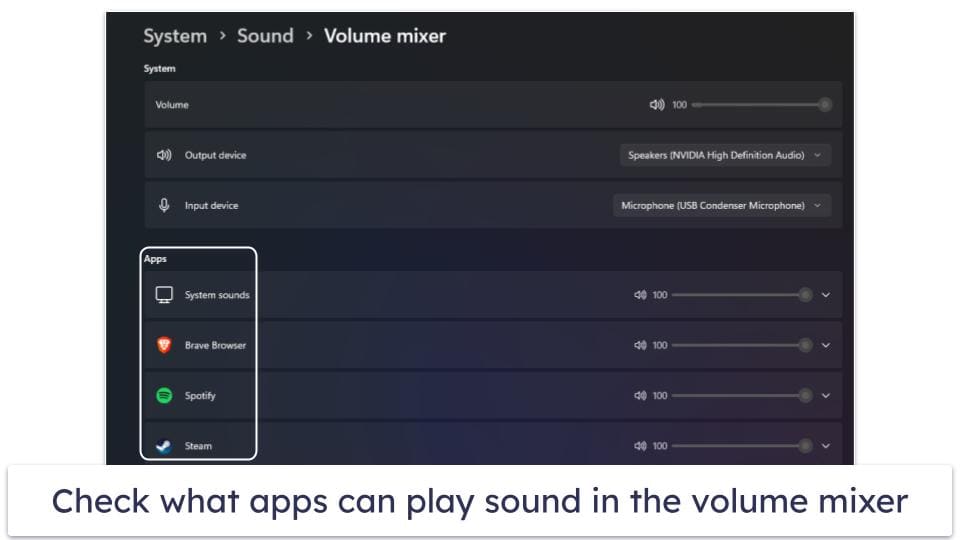
After that, check which apps are creating sound. On a PC or Mac, you can check your audio mixer by right-clicking the speaker icon in your taskbar and selecting either Audio Mixer or Volume Mixer. There, you’ll see a list of every app that sound can come from. You can’t close apps from this menu, but you can mute them while you figure out how to get rid of the random music. For example, on Windows, hold your mouse cursor over the speaker icon for a few seconds, and you’ll see a mute tool-tip pop up.
After you’ve established that the source of the music isn’t something perfectly normal, it’s safe to assume that it’s a PUP and you can move on to the next preliminary step.
Preliminary Step 2. Remove Suspicious Extensions and Reset Your Browser
The steps required to get rid of the random-music-playing virus will be slightly different depending on the PUP in question. Since the random-music-playing virus isn’t one specific virus (and isn’t technically a virus at all), the first thing you want to do is check for suspicious extensions on your device and remove any that you find.
To remove a suspicious browser extension:
- Open your browser’s extension manager. Look for a puzzle-piece-shaped icon in the top-right corner of your browser and click on it. You can also open your browser’s menu (3 dots or horizontal lines) and click Extensions (Add-ons and themes in Firefox).

- Scroll through your extensions and click the Remove button next to any you don’t recognize or find suspicious.

- Restart your browser and check the extension manager again. If the extension reinstalled itself, your next step will be to try resetting your browser. Follow the below steps to do this, depending on what browser you use:
If the extensions didn’t reinstall itself, you can jump straight to uninstalling suspicious applications.
Edge
To reset your browser on Edge, all you have to do is:
- Open Edge.
- Click on the Settings menu in the top right corner (it looks like 3 horizontal dots).

- Choose Reset settings.

- Select Restore settings to their default values.
- Finalize your choice.

If the problem is still there after you’ve removed suspicious extensions and reset your browser, it’s time to uninstall suspect applications.
Chrome
Resetting your browser on Chrome is easy, just:
- Open Chrome.
- Navigate to the Settings menu on the top right of the screen (it’s the 3 vertical dots). Next, click Reset settings.

- Choose Restore to their original defaults. Depending on your system, you may have one more menu. If that’s the case, choose reset settings one more time.
- Finalize your choice.

If you’ve reset your browser settings and tried removing suspicious applications to no avail, you’ll need to uninstall suspicious applications.
Firefox
Follow these steps to easily reset your Firefox browser:
- Click on the 3 horizontal dots on the top right to open the menu. Click on Help, then More troubleshooting information.

- Choose Refresh Firefox, then choose the same option on the next menu it opens.

If you’ve refreshed Firefox and random music continues to play, it’s time to look at suspicious applications.
Opera
Resetting your Opera browser only takes a few clicks, all you have to do is:
- Open Opera.
- Click on the O in the top left corner to open up a settings menu.
- Choose Update and Recovery.
- Select whether you want to keep your data and only reset the settings or if you want to reset everything.
- Click Reset and finalize your choice.
If random music just won’t stop playing, even after you’ve tried everything up to and including resetting your browser, you need to uninstall suspicious applications.
Preliminary Step 3. Remove Suspicious Applications
Removing suspicious applications will vary depending on your operating system, but it’s pretty easy on every platform. If you’re unsure, click on what device you’re using for a quick walkthrough:
Windows 10/11
- Type Add or remove into the search bar and click on Add or remove programs. This will display a list of every app installed on your computer.
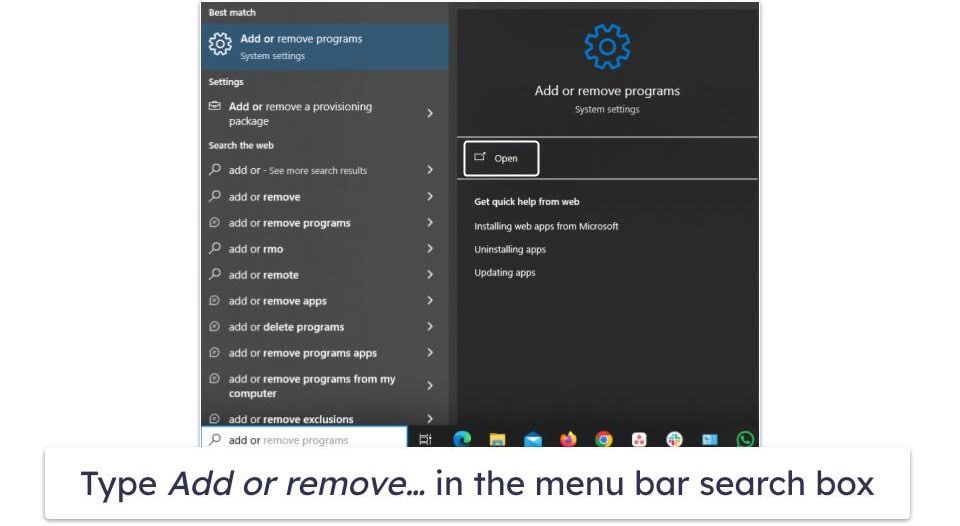
- Click on suspicious or unknown apps and then on Uninstall to remove them.
You can now proceed to Step 1: scanning your computer for malware.
Mac
- Select Applications using the Finder window to see a list of the applications installed on your Mac. Drag and drop the apps you wish to uninstall into the trash bin or right-click the application and select Move to Trash.
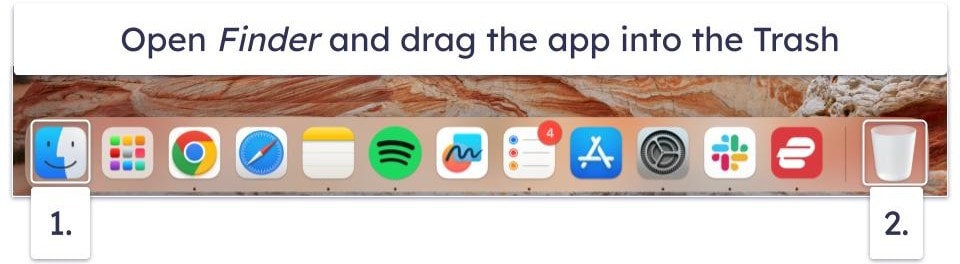
- To empty your trash, click on Finder and then on Empty Trash.
You can now move on to scanning your device with an antivirus.
Android
- Open Settings, then tap on Apps, and finally, tap See all apps.
- Scroll through the list until you find what you want to remove. Tap the app, then select Uninstall.

Once you’ve uninstalled all unwanted apps, you can scan your phone for malware.
iOS
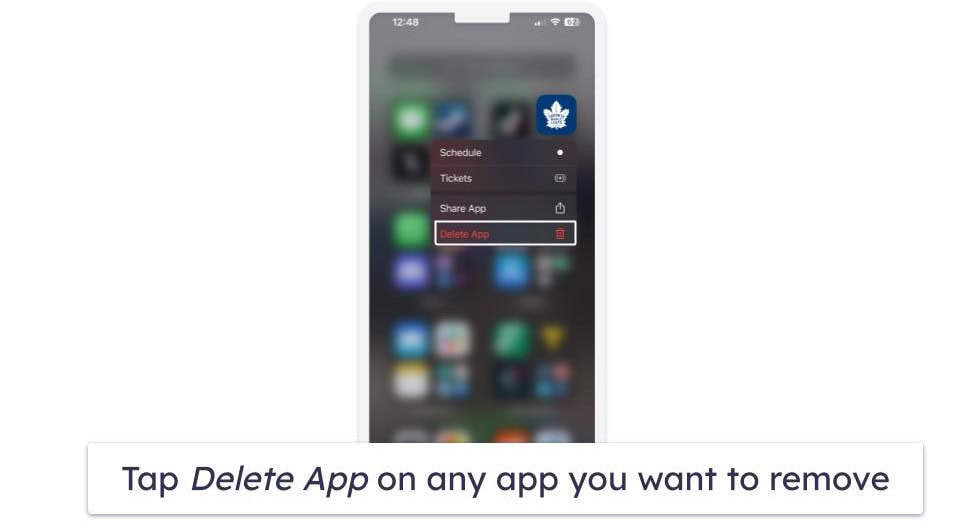
- Swipe across your homepage to get to your App Library. There, you can see a list of the apps you have installed. Review them for anything suspicious.
- To uninstall an app, hold it with your thumb until you see Remove App. Tap that and then press Delete App.
Unfortunately, antiviruses on iPhones aren’t able to run scans. If you’ve reviewed your apps and are still getting random music playing, you may have to restore your iPhone to its factory defaults. To do this, follow these steps:
- Open the Settings app.
- Tap General.
- Tap Transfer or Reset iPhone
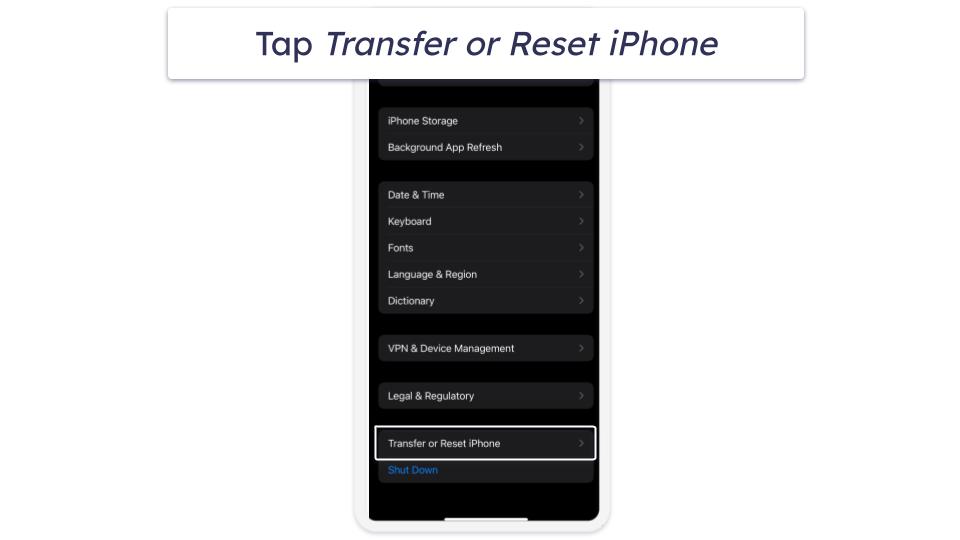
- Tap Get Started and follow the steps.
Be warned, this will delete all data on your iPhone and should only be used as a last resort. If this did remove the problem, proceed to Step 3.
Step 1. Identify the PUP With Your Antivirus (And Don’t Make the Problem Worse!)
Do not connect your cell phone, tablet, computer, or USB drive to any infected device. If you do this, you run a very high risk of the random music-playing virus spreading to that device as well.
If you think you know what the source of the PUP is, you can try uninstalling it manually using the methods above, but this won’t always work. Sometimes the PUP is coming from a deeper spyware or adware infestation and will simply reinstall itself if you attempt to delete it.
If you can’t get rid of the PUP on your own, download a reliable antivirus program like Norton and run a full system scan. Your antivirus will search through every file on your device, flagging every suspicious file and quarantining every trace of the random-music-playing virus (plus all other types of threats) for you, so you can decide how to handle them.

A full scan can take 1 to 2 hours, during which you shouldn’t stop the scan. Even if you see the virus you’re looking for in the detected file list, there’s no guarantee that there aren’t other PUPs lingering. Just sit tight until it’s finished.
You can then proceed to Step 2.

Step 2. Remove the PUP Infection and Delete Any Other Infected Files
After completing the scan, your antivirus will present you with a list of files it flagged as suspicious. Simply click/tap on the Remove button (or whatever prompt your antivirus gives you), and it will begin removing those files from your device.
Advanced users can inspect the quarantined files to make sure that nothing was falsely flagged before deleting them, but it’s usually best to trust your antivirus. If a trusted antivirus suite like Norton is flagging a file as a threat, chances are there’s a good reason.

Once you’ve removed the malware, it’s a healthy practice to restart your device and run one more full scan. This is to make sure that all instances of the random-music-playing virus are actually gone and won’t come back. Simply run one more full scan and sit tight. Fortunately, most antiviruses’ second full scans are significantly faster than the first.
As long as you don’t see any threats, it’s safe to say that your antivirus did its job and the PUP is gone.
Next, make sure your antivirus’s real-time protection is turned on, so you’re not exposed to thousands of malware and PUPs. This lets your antivirus constantly monitor your files and remove threats before they get a chance to infect your computer, ensuring you won’t pick up another PUP in the future.
Step 3. Keep Your Device From Getting Re-Infected
To avoid another infection, you’ll need to follow healthy cybersecurity practices. Staying safe online will always require some vigilance, but if you follow these tips, you’ll minimize the chances of getting another random music-playing virus or malware:
- Keep your drivers/programs up to date. If your drivers, apps, and programs aren’t up to date, you’re left exposed to every problem that’s been fixed in recent patches. While hackers do their best to exploit new vulnerabilities, companies are constantly introducing new security patches to try to fix these exploits, but you won’t see that benefit if you don’t update to the newest patch. It’s best to keep automatic updates on so you don’t need to manually update every program on your device. Some antiviruses, like Norton, offer optional add-ons such as a driver updater, that can update drivers for you.
- Avoid suspicious downloads. Be careful downloading things online, as hackers will bundle the random-music-playing virus with other downloads, such as PDFs, movies, games, apps, or email attachments. Never click on or open suspicious attachments in your email or links from strangers, and make sure to verify the legitimacy of a website before downloading anything from it. If you’re unsure if a website is safe or not, use a free website-checking tool like Norton Safe Web. Just copy and paste the link in question into the Safe Web search bar, and Norton will check it for threats.
- Download apps from official storefronts. While using your phone, try to only download apps that are available on official storefronts like the Google Play Store or the Apple App Store. Sometimes hackers can get malicious apps into an official store, so you should still be careful in vetting your apps. Make sure the company name on the app matches the official company name. You should also look for a lack of reviews or a suspicious amount of fake-looking reviews. A low amount of downloads on a popular app is also extremely suspicious.
- Learn how to install third-party apps safely. Sometimes it’s perfectly valid to need a third-party app on your phone, but in these cases, you should take extra care to ensure it’s safe. Make sure it’s from the official company website and use a website scanning tool like Norton Safe Web to make sure the site isn’t harboring any threats. If you try to install the app and it then attempts to download other bundled software on your behalf, immediately remove it and anything else it may have installed onto your device.
- Use web protection software. Downloading a good web protection extension (or using a secure browser like Norton Safe Search) protects you by scanning websites you visit to ensure they’re safe and by checking links for threats before you can open them. I highly recommend installing a web protection extension and leaving it on, since most forms of the random music-playing virus come from malicious web links and bundled downloads.
- Download a reliable antivirus program. A good antivirus program will thoroughly scan every file on your system, finding and destroying all types of PUPs and malware, including all forms of the random-music-playing virus. An antivirus will also provide much-needed security features, like real-time protection, a secure firewall for protecting your network, and a program updater.
Quick Summary of the Best Antiviruses for Removing Random Music Playing Virus


Frequently Asked Questions
What is the random music-playing virus?
The random music-playing virus is a catch-all term for a potentially unwanted program (PUP) that causes music to play against your will. Some random music-playing viruses may play songs after specific ads are triggered or when you open your browser, while others may continuously play music in the background with no clear way to make it stop.
Regardless of its exact symptoms, removing it with an antivirus is the most efficient solution. Once you notice symptoms of a random music-playing virus, run a full system scan using a reliable antivirus like Norton. It will search your files for PUPs (and all forms of malware) and remove them for you. Sometimes you can manually remove them, but some PUPs are resilient and complicated enough that you might make the infection worse.
How do PUPs get on your device?
PUPs typically come bundled with legitimate-looking free downloads that trick you into downloading them willingly. Threat actors will use a free download, file, or app as bait to lure you into downloading their file. Once you do, the random-music-playing virus also gets installed in the background.
PUPs are also usually hidden in deceptive advertisements, such as pop-ups on unsecured websites. In some cases, simply clicking on the ad will begin the download process. Using an antivirus with strong real-time and web protection is the best way to avoid accidentally installing PUPs on your device.
Can I get a random music-playing virus on my phone?
Yes, phones, too, can be infected by a random music-playing virus and other forms of PUPs. Even iPhones, which have strong built-in security features, can be infected by a PUP (or in this case a PUA).
It can come from several sources, such as an illegitimate download bundled with a third-party app or infectious spyware posing as a free app or download. Regardless of how it got on your device, random-music-playing viruses can tamper with your administrative settings and introduce further malware on your phone. Read my guide above to learn how to remove them.
Can I just delete the random music-playing virus?
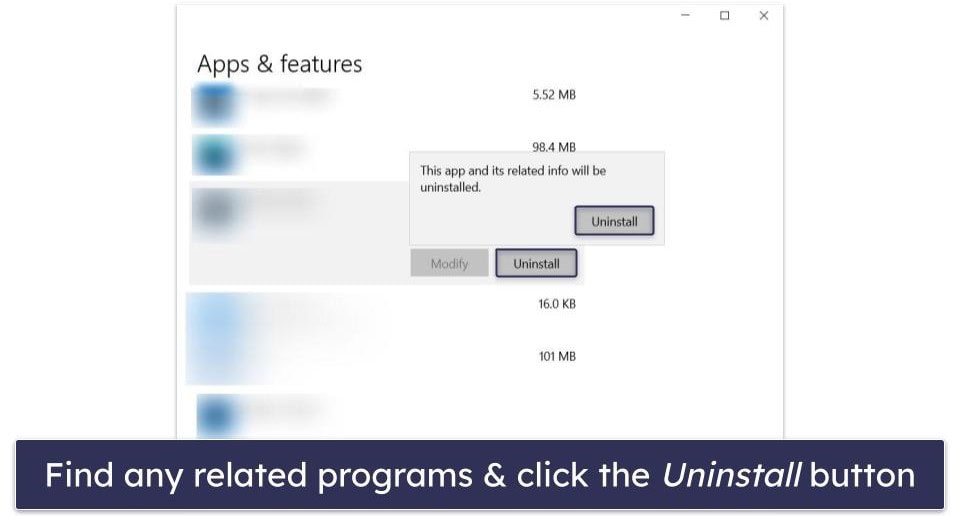
Sometimes. You can easily remove lesser threats by opening up your list of applications and removing any unwanted programs and extensions. On Windows, open up your Settings and click on Apps & features. From there you can see a list of your installed applications. Find any that look out of place and click Remove. If you’re using a phone, simply navigate to your phone’s application manager. Check your browser extensions as well by navigating to your browser’s extension manager and removing any extensions you don’t recognize.
However, sometimes, PUPs are a symptom of a larger infection, and they may reinstall itself again. Once a threat won’t let you remove it yourself, you need to run an antivirus scan using Norton or another top antivirus.


