
Published on: April 19, 2024 Updated 2 times since publishing
Short on time? Here’s how to remove fake Trojan spyware alerts:
- Close the Alert. If simply closing your browser’s tab doesn’t help, you’ll have to press Ctrl+Shift+Esc and terminate the task in Task Manager.
- Remove Rogue Extensions in Your Browser. Next, review potentially malicious browser extensions and settings. In case you find any, remove them.
- Scan Your Device. Use an antivirus program to perform a comprehensive scan (Norton has consistently been the best in my testing).
- Eliminate Malware. Once the scanning process finishes, allow the antivirus software to delete every trace of the malware.
- Maintain Security. To prevent future attacks, keep real-time protection enabled — again, I highly recommend Norton for this, although other effective alternatives exist.
Fake Trojan spyware alerts are designed to trick you into calling a fraudulent customer service number to address a non-existent problem on your device. Basically, scammers aim to steal your personal information, money, or gain access to your computer. Fortunately, you can easily remove these alerts with the right antivirus software — though there are important considerations.
For instance, many free antivirus programs are not equipped to handle such alerts, even if they claim to be. They often lack crucial features like real-time protection, a firewall, and web protection, which are all essential for protecting you against scams and malicious websites.
I tested various antivirus products, and Norton 360 consistently removed fake Trojan spyware alerts. It has perfect malware detection rates along with additional features like real-time protection and a Smart Firewall.
Preliminary Step 1. Close the Alert
It’s most likely the fake Trojan alert appeared inside your web browser. First, close the tab containing the alert without interacting with it in any way. If it keeps reappearing when you attempt to close it, terminate your web browser entirely using Task Manager (Windows) or Force Quit Application (Mac).
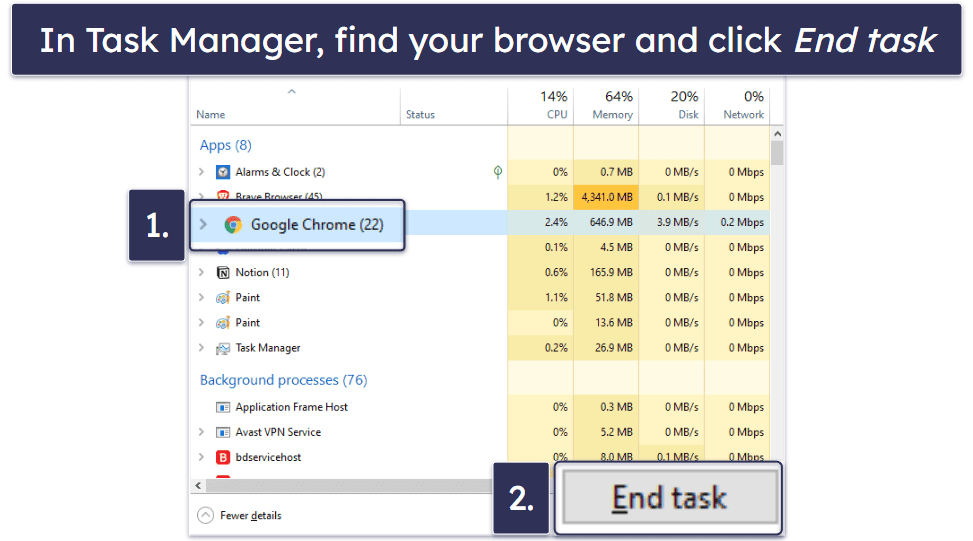
If you’re a Windows user, press Ctrl+Shift+Esc on your keyboard to open the Task Manager. Next, look for your browser in the list of active processes. Once found, select it and then choose End Task to close it.
If you’re a Mac user, press Option+Command+Escape, find Safari in this list of running applications (or whichever web browser you use), and click Force Quit.
With the alert cleared, you now need to reopen your browser and proceed to the next step (if you’re worried about reopening your web browser, look up instructions for opening your web browser in Safe Mode before proceeding).
Preliminary Step 2. Review Potentially Malicious Browser Extensions and Settings
Now, you should investigate whether the fake Trojan spyware alerts are linked to your browser extensions. If you find the culprit to be a browser extension, removing it is your next step. Here’s how to proceed:
- Remove rogue extensions on Chrome.
- Remove rogue extensions on Firefox.
- Remove rogue extensions on Edge.
- Remove rogue extensions on Safari (Mac).
Remove Rogue Extensions on Chrome
Though Chrome does a good job of protecting you from rogue browser extensions, they can still find their way in from time to time. Here’s how to remove the extensions causing the fake Trojan spyware alerts in Chrome:
- First, start by clicking the 3 vertical dots in the top right:

- Head to Extensions, then click Manage Extensions.

- Click Remove on any extensions you didn’t install or approve yourself.

You can now proceed to Step 1. However, if the alerts keep popping up, you may need to reset your browser to its default settings. This action will clear your browsing data, remove cookies, and revert all settings back to their original state. Here’s the process:
- Click the same 3 vertical dots and click Settings. Next, click on Reset settings.

- Search for the option Restore settings to their original defaults and click it when it shows up. Click Reset settings to complete the process.

- Then, head down to Step 1 of the malware removal procedure.
Remove Rogue Extensions on Firefox
If you’re using Firefox, here’s how to check for and remove bad extensions you don’t recognize:
- Click on the “puzzle piece” icon — this takes you to the Firefox add-ons/extensions menu.

- Click Extensions on the left-hand menu.

- Click the 3 dots beside any extension you want to delete, then click Remove.

Once you’ve reviewed your extensions, the alerts should stop. You can then scan your device for leftover malware. If you’re still getting the alerts, it’s a good idea to refresh your browser. Firefox offers the option to refresh, which resets the browser without losing your important data.
- Click the 3 horizontal lines in the top right, then Help.
- Click on More troubleshooting information.

- Click Refresh Firefox… and confirm your choice.

After that’s complete, head down to Step 1 of removing malware using antivirus software.
Remove Rogue Extensions on Edge
- Click on the extensions icon, followed by Manage extensions.

- Delete any suspicious-looking extensions.

After managing the extensions, the problem should be solved, and you can move down to Step 1. If it persists, you should reset Edge. This action will clear all cached data, including passwords, to help safeguard against access by scammers.
- Click on the 3 dots in the top right corner of Edge and then select Settings.

- Start by typing “reset” in the search bar, then click Restore settings to their default values. Confirm your choice.

When that’s done, you can move on to Step 1 of the virus removal process.
Remove Rogue Extensions on Safari (Mac)
You can easily remove unwanted browser extensions on Safari if you’re using a Mac. Here’s how to do that:
- Click Safari in the top menu bar, then click Settings.

- Click Extensions on the far right. Then, look for any strange or malicious extensions and remove them by clicking Uninstall.

After that, it’s time for Step 1: removing malware.
Step 1. Identify the Pop-Up With Your Antivirus (and Don’t Make the Problem Worse!)
IMPORTANT: Avoid connecting smartphones or USB sticks to a computer that’s compromised — doing so could transfer the malware to those devices as well.
Go ahead and install a reputable antivirus program, then start a full system scan of your entire computer. You can use one of the recommended apps on our list of the best antivirus software to accomplish this. Or you can check out Norton directly, since it’s number one on our list.
This deep scan is crucial for spotting and wiping out every trace of malware (including the kind that triggers those pesky fake Trojan spyware alerts), plus it discovers other sneaky threats like spyware, rootkits, and/or worms.

Note: Stick with the full scan until it’s done, even if the software flags the virus pretty early. Cutting corners could mean overlooking additional hidden nasties.
Expect the scan to last from a few minutes to over an hour (depending on your specific computer). It’s vital to be patient and let the antivirus scan through each file and process. By the end, it will have caught and isolated all forms of malware, including any that are part of schemes like the fake Trojan spyware alerts.

Step 2. Remove the Fake Trojan Spyware Alerts Infection and Delete Any Other Infected Files
Once rogue files are quarantined by your antivirus, you have the option to delete them. Alternatively, you might choose to review them before deletion if you prefer. However, in general, I recommend letting your antivirus do its job without interfering. If software like Norton or Bitdefender has identified a potential threat, your best bet is to remove the file.

After deleting these files, it’s a good idea to restart your computer and run another scan to make sure the malware (including fake Trojan spyware alerts) are completely removed. This second scan is generally quicker, as some antivirus programs remember which files were already checked and found safe.
Step 3. Optional — Install an Ad Blocker in Your Browser
While this step isn’t required, I strongly advise considering an ad blocker, such as the one offered by Private Internet Access (PIA). It’s a powerful virtual private network (VPN) that helps keep your browsing activities private and protect your personal information. PIA’s ad blocker is known as MACE, which blocks ads device-wide.
I’ve been using this VPN for quite a while, and it’s drastically reduced the frequency of unwanted pop-ups. Learn more about PIA and its powerful ad blocking capabilities.
Editor's Note: Private Internet Access and this site are in the same ownership group.
Step 4. Keep Your Device From Getting Re-Infected
It’s surprisingly easy to end up with malware on your devices, which is why keeping them malware-free is key to protecting your privacy and ensuring smooth operation. Here’s your guide to staying safe:
- Choose a reliable antivirus: A powerful antivirus, such as Norton, is crucial for spotting and stopping malware. Opt for one that includes system scans, real-time monitoring, automatic updates, and a strong firewall.
- Be cautious with downloads: Steer clear of files or links from unknown sources. Malware often masquerades as benign — so it’s important to confirm the reliability of websites and sources before downloading anything. An antivirus like Norton can be a great tool for identifying and preventing unsafe downloads.
- Fortify your network and gadgets: Use complex, unique passwords for your Wi-Fi and Internet-connected devices to shield your personal information. A quality password manager can be a big help here. For extra security, especially on public Wi-Fi, employ a VPN (Norton offers one) to keep your online activity private.
- Stay updated: Make sure your apps, operating system, and any drivers are always up to date. Hackers target flaws in old software, but updates patch these holes. Turn on automatic updates, and manually check for new versions frequently.
Navigating issues like fake Trojan spyware alerts — or worse — can be a major headache. Once you’ve dealt with them, sticking to these online safety habits and using a dependable antivirus for web surfing can greatly minimize future risks.
Quick Summary of the Best Antiviruses for Malware Scanning After Removing Unwanted Pop-Ups


Frequently Asked Questions
How do I get rid of fake Microsoft spyware alerts?
To get rid of fake Microsoft spyware alerts, use reputable antivirus software to scan and remove any malware. These alerts are often caused by adware or malicious software that tricks you into thinking your computer is infected, aiming to steal personal information or money. I highly recommend Norton 360 thanks to its perfect malware detection rates.
Running a full system scan with antivirus software can detect and eliminate these threats. Additionally, reviewing and removing suspicious browser extensions and resetting your browser settings to default can help prevent such alerts from reappearing. Always ensure your software is up to date to protect against the latest threats.
How do I get rid of a fake Trojan virus on Windows 11?
Start by running a thorough antivirus scan. Fake Trojan alerts are designed to scare you into downloading more malware or paying for unnecessary software. An effective antivirus program will detect and remove any malware from your system.
It’s also wise to check for and uninstall any unfamiliar programs through the Control Panel, as these could be related to the fake alert. Keep your operating system and all software updated to minimize vulnerabilities that malware could exploit, and consider using a malware removal tool for any persistent issues.
How do I get rid of Trojan threats?
You can remove Trojans by using a reliable antivirus or malware removal tool to perform a full system scan and delete any detected threats. After removing the threats, change all your passwords as a precaution, and check your system’s settings for any unauthorized changes a Trojan might have made. It’s important to keep your antivirus software updated and to avoid downloading files or clicking on links from unknown sources to prevent future Trojan infections. Regular backups of important data can also help mitigate damage from potential future infections.


